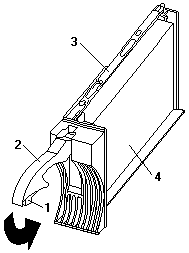
Replacing Drives (Hot Swap) - EXP200 Type 3530 - 1RU, 1RX
Replacing Drives (Hot-Swap)

To remove the hot-swap drives:
- Press on the inside of the bottom of the tray handle to release the blue latch -1-.
- Pull the handle -2- on the tray -3- out into the open position.
- Lift the drive CRU partially out of the bay.
Note: Wait at least 20 seconds before fully removing the drive from the expansion unit to allow for spin down.
Allowing for spin down avoids possible damage to the drive.
See 'Drive Numbering' when replacing drives.
- If you are replacing a slim-high drive, ensure that the filler piece remains in place for use with the new drive.
- Install the new drive, Making sure at least ten seconds have passed before you install the new drive tray.
Gently push the drive into the empty bay until the tray handle -2- touches the expansion unit bezel.
- Push the tray handle -2- down into the closed (latched) position.
- Check the LEDs.
- When drives are ready for use, the green Activity LED and the amber Fault LED should be off.
- If the Fault light is solid amber, pull up on the drive latch and lift the drive lever to pull the drive
partially out of the bay.
Wait at least 20 seconds before fully removing the drive from the expansion unit to allow for spin down.
If the SCSI adapter is the IBM ServeRAID II; go to the ServeRAID User's Guide for additional information and procedures on
changing the state of the drive from the current Default state to any other state
(for example, HSP, RDY, rebuild drive to ONL, and so on).
The amber LED should go off within 10 seconds of the drive state change (to something other than DDD).
If the SCSI adapter is the IBM ServeRAID II, in some cases, the drive will automatically reset to
either a hotspare (HSP) or be rebuilt (ONL).
See the ServeRAID II User's Guide for additional information.
If the state change in the ServeRAID II configuration does not change automatically (amber LED does not go off), then
refer to the ServeRAID II User's Guide for directions on how to perform a manual drive state change.
The amber LED should go off within 10 seconds of a drive state change (to something other than DDD).
If the state change in the RAID configuration does not change automatically, refer to the
RAID Controller User's Guide for directions on how to perform a drive state change.
LED drive status:
The following table shows the LED status on the drives:
| LED |
Description |
| Activity (green/flashing) |
Indicates read/write or inquiry operation |
| Fault (amber/flashing) |
Indicates drive rebuild or that drive has been
identified by software |
| Fault (amber) |
Indicates a drive failure |
Back to 
Please see the LEGAL - Trademark notice.
Feel free - send a  for any BUG on this page found - Thank you.


![]()
 for any BUG on this page found - Thank you.