Microprocessors
Microprocessors
When you install an additional microprocessor, the Netfinity 5000 can operate as a
symmetric multiprocessing (SMP) server.
With SMP, certain operating systems and application programs can distribute the processing load
between microprocessors.
This enhances performance for database and point-of-sale applications, integrated manufacturing
solutions, and other applications.
Installing Microprocessor Upgrades: The server comes with an
Intel® Pentium® II microprocessor.
This microprocessor incorporates MMX™ technology with built-in ECC level two (L2) cache.
For the latest information about microprocessor upgrades available for the server, contact the
IBM reseller, IBM marketing representative, or see http://www.pc.ibm.com/us/compat/
on the World Wide Web.
If you do upgrade the microprocessor, use the instructions that come with the upgrade along
with the (below) instructions in 'Installing or Replacing a Microprocessor'.

Installing or Replacing a Microprocessor
This section gives the procedure for installing microprocessors.
If you want to remove a microprocessor, reverse the order of the following steps.
Before you begin:
- Read 'Safety Information'
- Thoroughly review the documentation that comes with the microprocessor, so that you can
determine whether you need to update the server BIOS.
The 'ServerGuide and Netfinity Manager Information' section of this Server Library includes
IBM Update Connector, which keeps the BIOS and device drivers current.
You can also obtain the latest level of BIOS for the server through the World Wide Web and the IBM
Personal Computer Company Bulletin Board System (BBS). See the 'Getting Help Information' section of
this Server Library for the appropriate World Wide Web addresses and bulletin board telephone numbers.
- For a list of supported operating systems, see http://www.pc.ibm.com/compat/ on the World
Wide Web.
NOTE:
- If you have not already done so, go to http://www.pc.ibm.com/support/ on the World
Wide Web and download the appropriate flash update program.
Review the applicable README files, and use this information to create a Flash Utility Diskette.
Perform the POST/BIOS (flash) update procedure.
- The microprocessor in the server comes with an attached heat sink. The microprocessor plugs
into the microprocessor socket on the system board and is stabilized with a plastic bracket attached
to the system board.
- If you replace the microprocessor with one that has a different speed, you must change the
switch settings on the system board. To locate the switches, see 'System Board Connectors'.
For information about the appropriate switch settings, see Table 11, or
see the label inside the server cover.
 If you select a setting for the frequency switch that is greater
than the actual frequency of the microprocessor, you might damage the microprocessor.
To install a microprocessor:
- If you have not done so, remove the server cover. See 'Option Installation'.
- If you are installing an additional microprocessor, remove the terminator card from the secondary
microprocessor connector. Otherwise, go to step 3.
- Spread apart the posts of the secondary microprocessor connector bracket until the top of
the terminator card is past the restraining latches.
- Lift the terminator card out of the connector.
NOTE: When you install a second microprocessor, it becomes the startup (boot) microprocessor.
- Carefully remove the microprocessor from the static-protective package.
- If you are replacing a microprocessor, remove the existing microprocessor from its socket. Otherwise,
go to step 5.
- Locate the microprocessor socket on the system board. (See the illustration in 'System Board Illustration'.)
- Place the index fingers on the small retainer tabs -1- on the top of the microprocessor. Push in
toward the microprocessor until the tabs release.
NOTE: The illustrations in this section might differ slightly from the hardware.
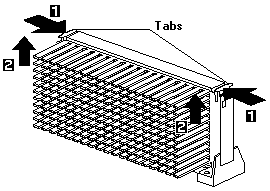
- Lift -2- the microprocessor out of the connector.
- Store the old microprocessor in a static-protective package.
- Touch the static-protective package that contains the new microprocessor to any unpainted
metal surface in the server, then, remove the new microprocessor.
- Press inward on the retainer tabs until they click into place.
NOTE: For the location of the retainer tabs, see the illustration in step 4b.
- Align the new microprocessor with the microprocessor connector on the system board and slide it into the
guides. Press the microprocessor down until it snaps into place and is fully seated in the connector.
- Pull outward on the retainer tabs.
- If you replaced the microprocessor with one that has a different speed,
you must change the switch settings on the system board. To locate the switches, see
'System Board Connectors'.
NOTE: If the processor does not react to switch changes, it is not an error.
Table 5. Switch Settings for Microprocessor Speed

NOTE: All microprocessors of speed 450MHz and up
will automatically set their internal speeds, so the switch setting
is not applicable.
- Because you installed a new microprocessor in the server, you must reconfigure the server.
Follow the procedure described in 'Configuration/Setup Utility Usage'.
- Because you installed a new microprocessor in the server, you might need to make changes to the
operating system.
- If the operating system does not support SMP, install one of the SMP operating systems that
the server supports. See http://www.pc.ibm.com/netfinity/ on the World Wide Web.
- If the operating system does support SMP, refer to the operating-system documentation.
You might need to make changes so that the operating system recognizes the new microprocessor.
- On some operating systems, if you install a second microprocessor it might be necessary to
reinstall the operating system. See the documentation that comes with the new microprocessor.
- If you want to install or remove any other options, do so now. Otherwise, go to
'Completing the Installation'.
Back to 
Please see the LEGAL - Trademark notice.
Feel free - send a  for any BUG on this page found - Thank you.