Completing the Rack Model Installation
Completing the Rack Model Installation
- Replace the top cover:
- Align the top cover with the top of the server, about 25 mm (1 inch) from the front of the server.
- Hold the cover against the server and slide the cover toward the front of the server until the
cover clicks into place.
NOTE: Be sure the front edge of the cover is flat against the server.

- Turn the captive thumbscrew -1- until the cover is secured.
- Replace the bezel, if it was removed.
- Place the bezel tabs -2- in the slots at the left front of the server.
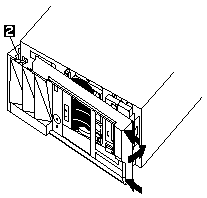
- Press the right end of the bezel toward the server front until the bezel clicks into place.
- Attach the monitor, keyboard, and power cables to the corresponding connectors on the server.
Refer to the rack documentation for instructions.
- If you have a modem or fax machine attached to the server, reconnect the telephone line
to the wall outlet and the server.
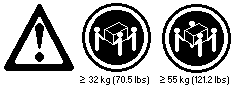
Caution Use save lifting practices when lifting the machine.
- If you are installing the rack model in the rack for the first time,
go to 'Installing the Server in the Rack Enclosure', and then
go to 'Updating the Server Configuration'. Otherwise, continue with the
following instructions to secure the rack model in the rack.
- Slide the rack model into the rack.
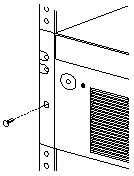
- Locate the screws that you removed in step 3.
- Insert the screws through the bracket, mounting rail, and cage nut.
What to do next When you have completed installing the cover and cables,
go to 'Updating the Server Configuration'.
Back to 
Please see the LEGAL - Trademark notice.
Feel free - send a  for any BUG on this page found - Thank you.