Installing or Removing Drives in Bays 1 throug 5 (Hard Disk Drives)
Installing or Removing Drives in Bays 1 through 5 (Hard Disk Drives):
This section gives the procedure for installing a hard disk drive. If you want to remove a drive,
reverse the following steps.
NOTE: To minimize the possibility of damage to the hard disk drives when
you are installing a hard disk drive in a rack model, install the rack model in the rack before
installing the hard disk drives.
 Attention: To avoid damage to a hard disk drive,
do not remove the drive from the hot-swap bay until it has had time to spin down (appr. 30 seconds).
Handle the drive gently.
Attention: To avoid damage to a hard disk drive,
do not remove the drive from the hot-swap bay until it has had time to spin down (appr. 30 seconds).
Handle the drive gently.
Before you begin
The Netfinity 5000 contains hardware that lets you replace a hard disk drive without
turning off the Netfinity 5000. These drives are known as hot-swappable or hot-swap drives.
Each hot-swap drive that you plan to install must have a hot-swap-drive tray attached.
The drive must have a single connector attachment (SCA) connector. Hot-swap drives come with
the hot-swap-drive tray attached.
NOTE:
- The Netfinity 5000 EMI integrity and cooling are both protected by having the hot-swap bays
covered or occupied. When you install a drive, save the filler panel from the bay, in case you
later remove the drive and do not replace it with another.
- The hot-swap bays connect to a SCSI backplane. This backplane is the printed circuit board behind
the hot-swap bays.
To install a drive in a hot-swap bay:
- Remove the filler panel -1- from one of the empty hot-swap bays by inserting the
finger into the depression at the top of the filler panel (tower model)
or left side of the filler panel (rack model) and pulling it away from the server.
Attention
To maintain proper system cooling, do not operate the Netfinity 5000 for more than two
minutes without either a drive or a filler panel installed for each bay.
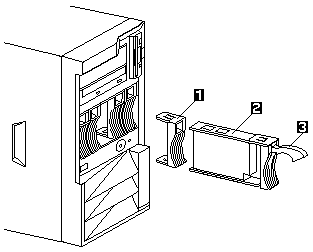
1 Filler Panel
2 Drive
3 Tray handle
- Install the hard disk drive -2- in the hot-swap bay.
- Ensure the tray handle -3- is open (that is, perpendicular to the drive).
- Align the drive-tray assembly so that it engages the guide rails in the bay.
- Gently push the drive-tray assembly into the bay until the drive connects to the backplane.
- Push the tray handle toward the drive until the handle locks.
- Check the hard disk drive status indicators to verify that the hard disk drives are
operating properly. See 'Front Panel Indicators' for details.
NOTE:
- There are no termination requirements for any SCSI hard disk drives installed in the
hard drive bays. Termination is achieved through the DASD backplane.
- If the Netfinity 5000 has a RAID adapter or controller, you might want to reconfigure
the disk arrays after installing hard disk drives, consult the documentation that came
with the adapter or controller.
- If you want to install or remove any other options, do so now.
Otherwise, go to 'Completing the Installation'.
Back to 
Please see the LEGAL - Trademark notice.
Feel free - send a  for any BUG on this page found - Thank you.