Fibre Channel Hub Rack Installation
Fibre Channel Hub Rack Installation
The Fibre Channel Hub comes with a tray and bezel for installation in a rack.
Note: Also use this procedure to assist in removing the Fibre
Channel Hub from a rack shelf.
To install the Fibre Channel Hub in the rack:
- Turn the hub upside down and place it on a flat surface.
- Turn the tray upside down and place it on the hub.
- Align the four holes in the tray with the holes in the hub.
Line up the back lip of the tray with the back side of the hub.
- Using a Philips head screw driver, install the four smaller screws
in the aligned holes.
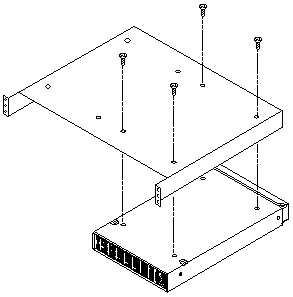
- Turn the tray over so that the hub is on top of the tray.
- Find the rack position into which you are installing the Fibre Channel Hub,
then, take four clip nuts and install them in the rear of the rack.
Make sure you have installed one in each screw hole you will be using for
the tray installation.
If the rack has square holes, snap the M6 clip nuts into place on the rear of the rack.
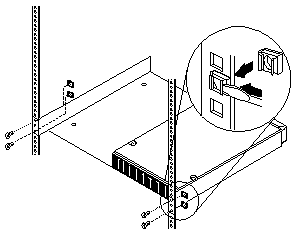
If the rack has round holes, slide the 10-32 clip nuts into place on the rear of the rack.
- Pick up the tray and line up the top and bottom screw holes with the clip nuts
on the rack. While holding the tray in place, install four of the larger screws.
If the rack has square holes and you used the M6 clip nuts, use the M6 hex washer headed screws.
If the rack has round holes and you used the 10-32 clip nuts, use the 10-32 hex washer headed screws.
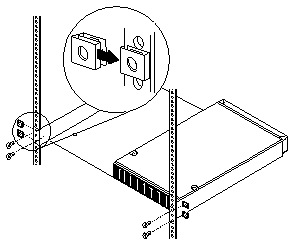
- Install the remaining four nut clips in the front of the rack.
Be sure to line them up opposite the hub and tray.
- Line up the top and bottom bezel screw holes with the clip nuts on the rack.
While holding the bezel in place, install four of the larger screws.
If the rack has round holes, use the 10-32 clip nuts and hex washer headed screws.
Back to 
Please see the LEGAL - Trademark notice.
Feel free - send a  for any BUG on this page found - Thank you.