Logical Drive Administration
Logical Drive Administration
See > ServeRAID System Board Controller - Setup
Use the following information to create logical drives, initialize and synchronizing logical drives, or access
blocked logical drives.
Creating Logical Drives:
 Each ServeRAID adapter or controller supports a maximum
of 8 logical drives. Depending upon the stripe-unit size
being used, you can combine a maximum of 8 or 16
physical drives into each logical drive.
To create a logical drive:
- Click on the icon on the Tool Bar or select
Manage Logical Drive from the Advanced pull-down menu, then, select Create Logical Drive.
A screen similar to the following appears.
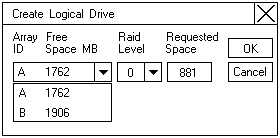
- Select the desired disk array ID from the pull-down list.
- Select the appropriate RAID level from the pull-down list.
NOTE: The number of hard disk drives in the array determines the RAID levels available for the array.
- If the array contains one hard disk drive, you can select only RAID level-0 for the logical drive.
- If the array contains two hard disk drives, you can select RAID level-0 or RAID level-1 for the logical drive.
- If the array contains three or more hard disk drives, you can select RAID level-0,
RAID level-1, or RAID level-5 for the logical drive.
- Enter the Requested Space in the entry field.
The ServeRAID program uses the maximum available space for the selected RAID level to calculate the
default value that it assigns.
NOTE: The actual logical drive size may be slightly different from what you type in the
Requested Space field. The RAID level and the number of hard disk drives determine the size of the
logical drive.
For example, a disk array consisting of three, 1 GB hard disk drives with a requested
RAID level-0 logical drive of 1000 MB will actually contain only 999 MB because the data is striped
across all three drives, with 333 MB on each drive.
- Click on OK to create the logical drive.
NOTE:
1. If you plan to use the Logical Drive Migration (LDM) feature, do not define more than seven
logical drives. The LDM feature requires one free logical drive to perform the migration. Refer
to 'Logical Drive Migration Administration' for more information.
2. If you plan to use the Change RAID Level function of the LDM feature, you must assign the
same RAID level to all logical drives within a single disk array.
Refer to 'Change RAID Levels' for more information.
Initializing Logical Drives: Initializing a logical drive
erases the first 1024 sectors on the drive and prevents
access to any data previously stored on the drive.
To initialize a logical drive:
- Select the desired logical drive from the Main screen
of the Administration and Monitoring Program.
- Click on Initialize to initialize the drive.
- If you have initialized a RAID level-5 drive, you must
synchronize to ensure data integrity. See (below) 'Synchronizing Logical Drives.'
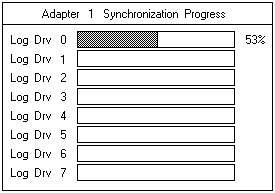
Synchronizing Logical Drives: The purpose of synchronizing logical drives
is to compute and write the parity data on the selected drives.
If the type of ServeRAID adapter or controller you are using does not support the auto-synchronization and
data-scrubbing features, manually synchronize your RAID
level-1 and RAID level-5 logical drives weekly. This does not alter data on the drive.
Synchronizing a logical drive verifies that the data redundancy for the logical drive is correct.
To synchronize a logical drive:
- Select the desired logical drive from the Main screen of the Administration and Monitoring Program.
- Click on Synchronize to synchronize the drive.
- The synchronization begins automatically and reports progress information on the screen.
NOTE: Only one synchronization command can be active at a time.
Unblocking Logical Drives: When the ServeRAID adapter or controller
performs a Rebuild operation on an array, it reconstructs the data that was stored in RAID
level-1 and RAID level-5 logical drives.
However, the ServeRAID adapter or controller cannot reconstruct the data that was stored
in any RAID level-0 logical drives in that array. The data in the RAID level-0 logical drives is
blocked when the ServeRAID adapter or controller detects that the array is valid, but the data
might be damaged.
After the Rebuild operation completes, you can unblock the
RAID level-0 logical drives and access them once again.
But remember, the logical drive might contain damaged
data. You must either re-create, install, or restore the data
from the most recent backup disk or tape.
To unblock a blocked drive:
- Select the blocked logical drive from the Main screen of the Administration and Monitoring Program.
- Click on Unblock to unblock the drive.
- Initialize all unblocked logical drives before using
them. See (above) 'Initializing Logical Drives'.
- Restore the data to the drive from your most recent backup disk or tape.
Back to 
Please see the LEGAL - Trademark notice.
Feel free - send a  for any BUG on this page found - Thank you.