System Board Removal
System Board Removal
Note:
- Read 'Safety Information'.
- If possible, record the configuration settings
before removing the system board (see
'Configuration/Setup Utility Program').
To remove the system board, do the following:
- Turn off the server and peripheral devices and disconnect all external cables
and power cords (see 'Preparing to install options'), then
remove the top cover (see 'Top Cover Removal').
- Disconnect all adapter cables and remove the
adapters (see 'Adapters'
and 'Hot-plug PCI adapter installation').
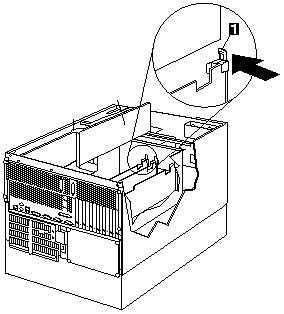
- Remove the adapter dividers.

- Press on the adapter divider release tab -1- and
lift the divider out of the system.
- Repeat the procedure for each adapter divider.
- Remove the processor board (see 'Processor Board Removal').
- Disconnect all system board cables.
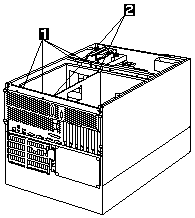
- Remove the processor card support tray housing.

- Remove the processor card support tray
housing screws -1-.
- Lift the support tray housing latches -2- to
release the housing from the shuttle, then, lift the
housing out of the system.
- Remove the system board dust cover -1-.

- Remove (10 screws) the system board.
- Remove the system board mounting screws,
then, remove the system board.
Back to 
Please see the LEGAL - Trademark notice.
Feel free - send a  for any BUG on this page found - Thank you.


