Installing the Server in the Rack
Installing the Server in the Rack
In this section, you will use eight screws (M4 by 8).
To install the server in the rack:
- Fully extend the slide-bracket assemblies until they
lock.
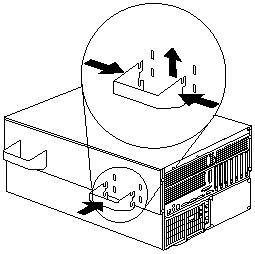
- Install the four lift handles on the sides of the server:
- Press in on the sides of the lift handle near the
tabs and insert the handle tabs into the slots on
the side of the server.
- Move the handle up in the slots so that the
hooked part of each tab is inside the server.
Release the pressure on the sides of the handle.
- Install the remaining three lift handles.


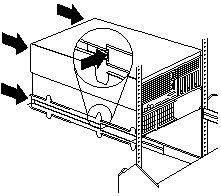
Use safe lifting practices when lifting the machine.
- Lift and position the server so that the bayonet slots
on the server are above the bayonets on the
slide-bracket assemblies.
- Lower the server and slip the bayonets into the
bayonet slots.
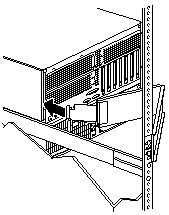
- Insert screws through one slide-bracket assembly and
server side. Tighten the screws. Repeat this step for
the other slide-bracket assembly on the opposite side
of the server. This secures the server.

- Remove the four lift handles from the sides of the
server:
- Grasp the lift handle and press in on the sides of
the lift handle near the tabs until the tabs touch
the inside edges of the slots.
- Move the handle down in the slots so that the
hooked parts of the tabs clear the top edges of
the slots, then, pull the handle away from the
server.
- Remove the remaining three handles. Store the
handles in a safe place.
Note:
When the drawer is fully extended, safety latches
on the slide-brackets lock into place. To release
the safety latch, press the latch on each side of
the rack.
- Press the safety latches and slide the drawer about
halfway into the rack.
- Attach the cable-management arm to the server using
the captive screws.
- Attach the monitor, keyboard, and power cables to
the corresponding connectors on the server. Refer to
the rack documentation for instructions.
- Attach the cables to the cable-management arm using
cable ties.
- Attach the two bezel brackets (one for each side) to
the front sides of the server with the six screws
provided.
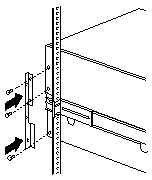
- Secure the server in the rack:
- Slide the server into the rack.
- Secure the server to both sides of the rack by
inserting screws (M6 by 16 mm) through the
bezel brackets, mounting rails, and cage nuts.

- Install the rack front door.
- To complete the installation, refer to the
documentation that came with the rack.
Back to 
Please see the LEGAL - Trademark notice.
Feel free - send a  for any BUG on this page found - Thank you.