Rack Installation
Rack Installation
This chapter provides instructions for installing a server in
a rack and for removing a server from a rack.
The server comes with all the rack installation hardware
(rack model only). Review the (below) preinstallation information in
'Before You Begin', then, continue with (below)
'Installing and Removing the Server.'
 > 50 kg (110 lbs)

Do not place any object weighing more than
50 kg (110 lbs) on top of the rack model of the
server.
Before You Begin
You will need the following items:
- An assortment of small screwdrivers
- 8-inch adjustable wrench or pliers
Some of the installation procedures require three people.
- To ensure rack stability, plan the installation of
servers in the rack starting from the bottom. For
more information, refer to the IBM Netfinity Rack
Configurator program provided with ServerGuide.
- Review the documentation that comes with the rack
enclosure for safety or cabling considerations.
Ensure that the planned installation is within the
rack's guidelines for heat generation, electrical
requirements, air flow, and mechanical loading.
- Verify that the rack can meet the operating
parameters, as detailed in 'Specifications'.
Installing and Removing the Server: During
the installation procedure, you must install parts on the
rack and the server. This process can be divided into two
parts:
- Preparing the rack
- Installing the server in the rack

Use safe lifting practices when lifting the machine.
In this section, you will use the following parts:
- BM Installation Template
- Two slide-bracket assemblies
- One cable-management arm
- Two bezel brackets
- Six screws (for attaching the bezel brackets)
- Sixteen long screws (M6 by 16 mm)
- Eight short screws (M4 by 8 mm)
- Six cage nuts
- Two hex nuts (M6)
- Four lift handles (shipped with some servers)
- Cable ties
- One server bracket (for attaching the cable
management arm to the server)
 To ensure rack stability, plan the installation of servers
in the rack starting from the bottom.
To ensure rack stability, plan the installation of servers
in the rack starting from the bottom.
To attach the mounting hardware to the rack:
- Remove the rack front door. Refer to the rack
documentation for instructions.
- Mark the positions of the slide-bracket assemblies,
bezel brackets, and the cable-management arm on
the rack:
- Position the installation template on the front
mounting rails on the rack, aligning the holes.
- Mark the holes for the slide-bracket assemblies
and bezel brackets.
- Move the template to the same U level at the
rear of the server and mark the locations for the
slide-bracket assemblies and cable-management
arm.
- Install the six cage nuts at the locations marked
on the mounting rails.

- Attach a slide-bracket assembly to the front of the
rack:
Note:
- Get another person to help you attach the
slide-bracket assemblies to the rack.
- The slide-bracket assemblies can be installed on
either the left or right side of the rack.
- Refer to the illustrations for examples of the
proper alignment of the slide-bracket assemblies.
- Position the slide-bracket assembly behind the
mounting rail so that the slides will extend out
from the front of the rack.
- If necessary, loosen the screws at the rear of the
slide bracket assembly and adjust the length of
the slide-bracket to fit the mounting rail. Tighten
the screws.
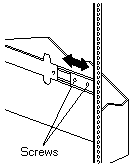
- Insert screws (M6 by 16 mm) through the
mounting rail to the slide-bracket assembly. Do
not tighten the screws.

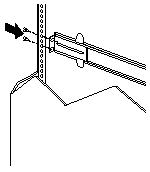
- Attach the slide bracket assembly to the rear of the rack:
- Position the slide-bracket assembly inside the
mounting rail.
- Insert screws (M6 by 16mm) through the
mounting rail to the slide-bracket assembly. Do
not tighten the screws.
- Attach the other slide-bracket assembly to the front and rear of the rack.
- Push the slide-bracket assemblies to the outermost positions on the rack.
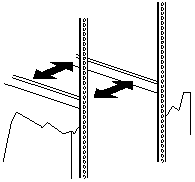
- Tighten all screws to secure both slide-bracket assemblies.
If you are using a torque screwdriver,
use the following torque setting: 8--11 Nm (70.8 - 97.0 in/lbs).
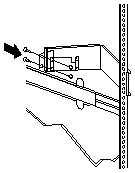
- Attach the cable-management arm to the rear of the
rack:
- Position the cable-management arm bracket on
the outside of the mounting rail.
- Insert screws (M6 by 16 mm) through the
cable-management arm bracket, mounting rail,
and cage nuts. Tighten the screws.
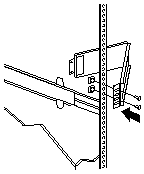
- Position the server bracket on the
cable-management arm.
- Insert screws through the cable-management
arm and the server bracket. Attach M6 hex nuts
to the screws and tighten the hex nuts.
Back to 
Please see the LEGAL - Trademark notice.
Feel free - send a  for any BUG on this page found - Thank you.