Changing the Write Policy
Changing the Write Policy
When you configure a
logical drive, the ServeRAID controller sets the write policy
to write-through (WT) mode, where the completion status
of a write command is sent after the data is written to the
hard disk drive. Under certain workloads, you can improve
performance by changing the write policy to write-back
(WB) mode, where the completion status is sent after the
data is copied to cache memory, but before the data is
actually written to the storage device.
Although you might gain performance with write-back
mode, it creates a greater risk of losing data due to a
power failure. If a ServeRAID controller failure occurs
while data is in the cache the data is lost. This is because
the system gets a completion status message when the
data reaches cache memory, but before data is actually
written to the hard disk drive.
To change the write policy:
- Start the ServeRAID Configuration program (see
'Starting the ServeRAID Configuration Program').
- Select Advanced Functions from the Main Menu,
then, press Enter.
- Select Logical Drive Parms Management from the
Advanced Functions menu, then, press Enter.
- Select Change Write Policy from the next menu,
then, press Enter.
A screen similar to the following appears.
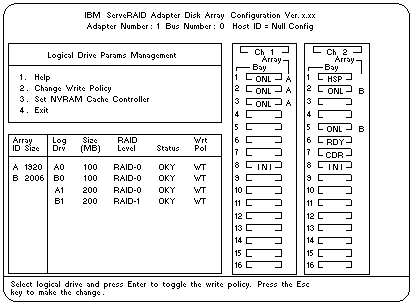
- Locate the Wrt Pol field in the Logical Drive list
The write policy is shown as either write through (WT), which is the default
setting, or write back (WB).
- Select the logical drive whose write policy you want to change.
 If you change the write policy to WB, wait at least
10 seconds after the last operation before you turn off the system. It takes that
long for the system to move the data from the cache memory to the storage device.
If you change the write policy to WB, wait at least
10 seconds after the last operation before you turn off the system. It takes that
long for the system to move the data from the cache memory to the storage device.
Failure to follow this practice can result in data loss.
- Press Enter to change the write policy. (You can press Enter
to toggle between WT and WB.)
- Press Esc The Confirm pop-up window appears.
- Select Yes to save the changes, or select No to return the settings to its
original state, then, press Enter.
- Back up the disk-array configuration information to diskette. See
'Backing Up the Disk-Array Configuration' for more information.
Back to 
Please see the LEGAL - Trademark notice.
Feel free - send a  for any BUG on this page found - Thank you.