Using the ServeRAID Administration Functions
Using the ServeRAID Administration Functions
This section describes how to administer
the ServeRAID controller using the following functions:
Array Administration: This section contains
instructions for creating a disk array and deleting a disk
array using the ServeRAID Administration and Monitoring
utility program.
Creating Disk Arrays

Disk arrays provide access to hard disk drives in a logical manner. Hard disk drives are grouped in a disk array,
and divided into logical drives for access by the operating system.
To create a disk array:
- Click on the
 icon on the tool bar or select Manage Disk Arrays
from the Advanced pull-down menu, then, select Create Disk Array.
Disk arrays provide access to hard disk drives in a logical manner. Hard disk drives are
grouped in a disk array, and divided into logical drives for access by the operating system.
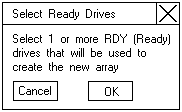
A screen similar to the following appears.

- Select one or moreReady (RDY) drives for the new disk array.
To select a RDY drive, click on the desired RDY button from the drive area.
A disk area identifier appears beside each RDY drive added to the disk array.
If you change the mind about a selected drive, select the button again to remove the selected
drive from the disk array.
- Click on OK to define a logical drive for the new array.
A screen similar to the following appears.

- Select the RAID level that you want to assign to the logical drive from the pull-down list.
The RAID levela available depend on the number of hard disk drives that you select for the disk array.
If you have one hard disk drive, the logical drive can be only RAID level 0.
If you have two or more hard disk drives, the logical drive can be RAID level o or 1.
If you have three or more hard disk drives, the logical drive can be RAID level 0, 1 or 5.
- Type the size, im megabytes, that you want to assign to the logical drive in the
Requested Space entry field.
Note:
1. The Requested Space default value is calculated as the maximum
logical drive size available for the RAID level assigned.
2. The Requested Space must be between 2MB and the maximum available.
3. The actual logical drive size that appears might be slightly different
from what you type in the Space Requested field.
The size of a logical drive is determined by the RAID level and the
number of hard disk drives. For example, a disk array consisting
of three, 1GB hard disk drives with a requested RAID level 0 logical drive
of 1000MB will actually contain only 999MB because the data is striped
across all three drives, with 333MB on each drive.
- Click on OK to create the disk array.
- You must initialize all new logical drives before storing data in them.
See 'Initializing Logical Drives'.
Note:
All new RAID level 5 logical drives are automatically synchronized
when you initialize them.
Deleting Disk Arrays

Deleting a disk array deletes all logical drives that are defined in that array.
All data and programs in the disk array are lost during this procedure.
Note:
For some operating systems, deleting a disk array and
its associated logical drives will change the drive
letters that are assigned to the remaining drives when
you restart the system.
 Before proceeding, ensure that you have backed up
any data and programs that you want to save.
- Click on the
 icon on the tool bar or select Manage Disk Arrays from the
Advanced pull-down menu, then, select Delete Disk Array.
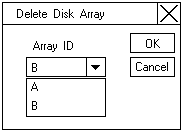
A screen similar to the following appears.

- Select the disk array ID that you want to delete from the pull-down list.
- Click on OK to delete the disk array.
Back to 
Please see the LEGAL - Trademark notice.
Feel free - send a  for any BUG on this page found - Thank you.
 icon on the tool bar or select Manage Disk Arrays


 Before proceeding, ensure that you have backed up
any data and programs that you want to save.

