Checking the Battery Pack (2640)


Checking the Battery Pack

Battery charging will not start until the Fuel-Gauge shows that less than 95% of the total power remains; with this condition the battery pack will charge to 100% of its capacity. This protects the battery pack from being over-charged or having a shortened life.

Do the following:

  1.  Power-off the computer.
  2.  Remove the battery pack and measure the voltage between battery  terminals 1 (+) and 4 (-)


    Terminal Voltage (V dc) / Signal
    1 + 0 to + 13.5
    2 Send
    3 Thermal
    4 Ground (-)
    5 Select


    NOTE: Signal lines, not used in these steps,  are used for communication between the system and the battery.

  3.  If the voltage is less than + 11.0 Vdc, the battery pack has  been discharged.  Recharge the battery.
     If the voltage is still less than +11.0 Vdc after recharging, replace the battery.

    NOTE: If the voltage of the battery pack is 0 V, it is not defective.  replace the battery.

  4.  If the voltage is more than + 11.0 Vdc,  measure the resistance between  battery terminals 3 and 4.  The resistance must be 4 to 30 kilohms.

    If the resistance is not correct, replace the battery pack.
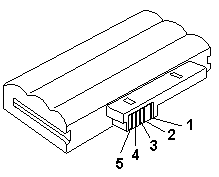
     If the resistance is correct, replace the system board.


Back to  Jump to TOP-of-PAGE

Please see the LEGAL  -  Trademark notice.
Feel free - send a Email-NOTE  for any BUG on this page found - Thank you.