Checking the Standby Battery


Checking the Standby Battery
  1.  Power-off the computer and unplug the AC Adapter  from the computer.
  2.  Open the keyboard, and remove the battery pack and the  diskette drive.
  3.  Remove the standby battery. (Refer to '1100 Standby Battery and Front IR' to  remove the battery.)
  4.  Measure the voltage of the standby battery.

  5.  Plug the AC Adapter  into the computer and power-on the computer.
  6.  Measure the output voltage at the connector on the system board.
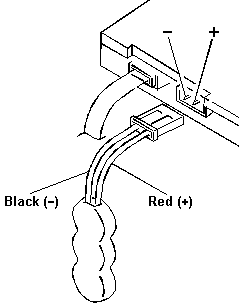
     

    Pin Voltage (Vdc)
    + +4.0
    - Ground


  7.  Ensure that the AC Adapter is plugged into  the computer, then power-on the computer.
  8.  Charging of the standby battery starts.  A depleted battery needs approximately 30  minutes to be recharged to the operational voltage of +3.5 Vdc.
  9.  Unplug the AC Adapter.
  10.  Verify the standby battery function by removing and installing  the battery pack during suspend mode.

NOTE: Removing and installing the battery pack during suspend mode should be done within one minute. The resume operation must start. If the resume operation does not work, switching of power from the battery pack to standby battery will not be correct. Replace the DC/DC card.
If replacing the DC/DC card does not resolve the problem, replace the system board.


Back to  Jump to TOP-of-PAGE

Please see the LEGAL  -  Trademark notice.
Feel free - send a Email-NOTE  for any BUG on this page found - Thank you.