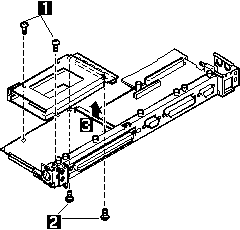
2130 PCMCIA Slot Assembly
2130 PCMCIA Slot Assembly

NOTE:
- When handling the PCMCIA slot assembly,
be careful not to disassemble any part of it.
The slot assembly is not solidly fixed when it is removed from the
system board or the FRU.
In step 4, gently pull up the bottom of
the center area of the connector board edge with your fingers.
- The screw stand located each corner of
the PCMCIA slot, is easy to remove.
Make sure that the screw stand is located when replace the slot.
Do not replace the slot without the screw stand.
Use the following table for reference when replacing parts.
| Step |
Location (Quantity) |
Length |
| 1 |
PCMCIA slot, upper (2) |
12 mm |
| 2 |
PCMCIA slot, lower (2) |
14 mm |
NOTE: Make sure you use the correct screw. Screw Size Chart
Back to 
Please see the LEGAL - Trademark notice.
Feel free - send a  for any BUG on this page found - Thank you.


![]()
 for any BUG on this page found - Thank you.