2120 System Board Assembly
2120 System Board Assembly
 The EEPROM on the system board contains the vital product data (VPD),
that is, system unit serial number, system board serial number, and other
computer unique data. When the system board is replaced, the system unit
serial number must also be restored.
Use the Set system identification utility on the maintenance
diskette to restore the number.
Do not power-off the computer when restoring the VPD.
The serial number label is attached to the bottom cover.

NOTE:
- For Model 755C, there are two types the system boards.
Make sure the correct system board by checking the part number
in the part list.
After replacing the system board, run the display test
from the Easy-Setup and
use the Pause button to check the color graduations
that are displayed after the Video Page screen.
If the color blocks in one column are all the same color,
replace the system board.
- Before removing and replacing the system board, make sure that the
PCMCIA
cards are removed and the eject levers are not sticking out.
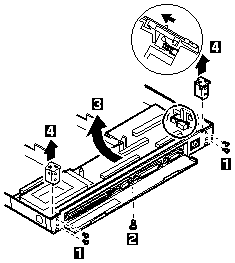
- When replacing
the system board assembly, align the power-key slide
hub with the power-switch actuator by moving the power-key in
the direction of the arrow.
See the large circle in the figure.
Before tightening
any screws, check that the power-switch operates correctly.
- Do not pull the PCMCIA slot assembly while removing the system board.
Use the following table for reference when replacing parts.
| Step |
Location (Quantity) |
Length |
| 1 |
Hinge bracket (4) |
4 mm |
| 2 |
Base cover, lower shield (1) |
4 mm |
NOTE: Make sure you use the correct screw. Screw Size Chart
Back to 
Please see the LEGAL - Trademark notice.
Feel free - send a  for any BUG on this page found - Thank you.

 The EEPROM on the system board contains the vital product data (VPD),
that is, system unit serial number, system board serial number, and other
computer unique data. When the system board is replaced, the system unit
serial number must also be restored.
Use the Set system identification utility on the maintenance
diskette to restore the number.

![]()
 for any BUG on this page found - Thank you.