1130 PCMCIA Slot Assembly
1130 PCMCIA Slot Assembly

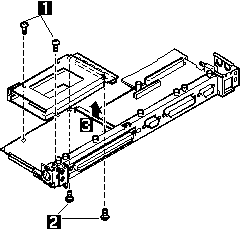
The system board can be damaged if the lower shield touches the
system board components.
Carefully follow the next instruction.
In step 4,
gradually raise the system board from the lower shield until all the
components of the system board just clear the tabs of the
lower shield.
Be careful not to raise it too far.
While keeping the clearance to a minimum, separate the system board
from the lower shield by moving the system board
straight forward as shown by step 2
NOTE:
- When handling the PCMCIA slot assembly,
be careful not to disassemble any part of it.
The slot assembly is not solidly fixed when it is removed from the
system board or the FRU.
- The screw stand-off located each corner of
the PCMCIA slot, is easy to remove.
Make sure that the screw stand-off is positioned when replacing
the slot. Do not replace the slot without the screw stand.
Use the following table for reference when replacing parts.
| Step |
Location (Quantity) |
Length |
| 1 |
PCMCIA slot, upper (2) |
12 mm |
| 2 |
PCMCIA slot, lower (2) |
14 mm |
NOTE: Make sure you use the correct screw. Screw Size Chart
Back to 
Please see the LEGAL - Trademark notice.
Feel free - send a  for any BUG on this page found - Thank you.