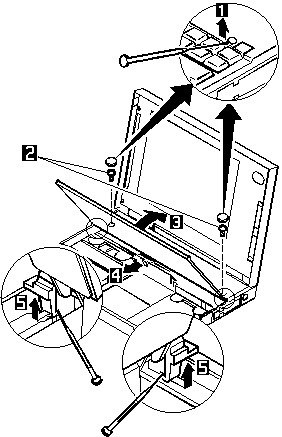
1040 Keyboard Unit


1040 Keyboard Unit


1 When removing the screw covers, use a small screwdriver as shown.


2  
When using a screwdriver to remove cover or latches, be careful not to:


3 Open the keyboard.
4 Remove the leaf-spring plate.
5 When unlatching the upper cover latches to remove the upper cover, use a small screwdriver as shown.
 

6 Remove the upper cover.

NOTE: To remove the upper cover, do not latch the keyboard. Lower the keyboard and remove the upper cover.

7 Disconnect the cables to remove the keyboard unit as shown.


  Do not pull the keyboard cables.

The keyboard cables can be damaged if the keyboard is disconnected without releasing the three latches 7

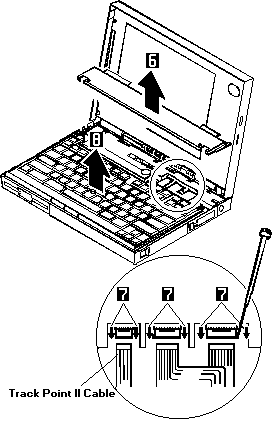
8 Remove the keyboard.


Use the following table for reference when replacing parts.

Step Location (Quantity) Length
2 Upper cover (2) 8 mm


NOTE: Make sure you use the correct screw. Screw Size Chart

Notes for when replacing.

  1.  When replacing the keyboard,  check that the three cables are clean, and  inserted straight and fully into the connectors.  Slide both ends of each latch at the same time  to make sure that each cable is correctly inserted.

     
      While pressing the cables into place,  be careful not to break the flexible  cables.

     Go to 'Keyboard / Auxiliary Input Device Checkout' and test all keys before returning the  computer to the customer.

  2.  When replacing the upper cover,  insert the two latches located on the rear side of the cover  into the guide of the LCD foot, then push the right, left,  and front sides to snap them into place. Be careful not to damage the suspend/resume switch when  putting on the cover.


Back to  Jump to TOP-of-PAGE

Please see the LEGAL  -  Trademark notice.
Feel free - send a Email-NOTE  for any BUG on this page found - Thank you.