Replacing the LCD Assembly
Replacing the LCD Assembly
To reattach the LCD assembly,
follow these steps:
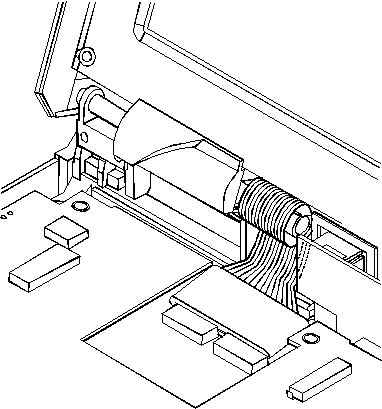
- With the LCD cable flat,
carefully
wrap the end
of the LCD cable around the attached sleeve on the
cable, finishing with
the end
of the cable
coming from behind the sleeve.
- To prevent possible damage,
tape the end of the cable to the bezel
while you reattach the LCD assembly.
- Place the LCD assembly on the base in the closed position.
Make sure that the backlight and microphone cables are inside
the base unit.
- Replace the four hinge screws (BG).
- Open the computer lid all the way (180°)
and remove the tape from the
the LCD cable.
- Slide the ferrite core over the end of the
LCD cable, pushing the core onto the cable
just far enough
to expose the two sets of silver contacts on the cable.
- Connect the LCD cable to the connectors
on the bottom system board by inserting the flat
ends of the cable. Then, push in the small
sliding latch under each cable to secure the cable in the
connector.
Do not bend or fold the LCD cable. Press on the loop of cable around
the sleeve to insert the cable ends into the connectors.
- Pull the ferrite core forward on the cable until
the core touches the connectors and it can be pressed
down flat on top of the bottom system board.
Back to 
Please see the LEGAL - Trademark notice.
Feel free - send a  for any BUG on this page found - Thank you.