Checking the Voltage Converter (700, 700C)


Checking the Voltage Converter (700, 700C)

Use the following procedure to isolate a problem with the ThinkPad 700, 700C voltage converter.

NOTE: If the problem only occurs when using the computer with a good battery pack, replace the voltage converter.
  1.  Power-off the computer.
  2.  Power-off all attached devices and disconnect them from the computer.
  3.  Unplug the AC adapter cable and remove the battery pack  from the computer.
  4.  Carefully place the computer bottom-side up  and remove the bottom cover.
  5.  Plug the AC adapter cable into the computer.
  6.  Power-on the computer.

        Be careful not to actuate the suspend switch (located between the Esc key and  the LCD) during the operation. When you turn the computer upside down with  the LCD opened, put something under the computer to prevent accidentally  actuating the suspend switch.

  7.  Check the voltages of the voltage converter on the system  board.

    Signal Vdc Min. Vdc Max.
    VA +4.75 +5.25
    VG +4.75 +5.25
    VB +4.75 +5.25
    VC +3.42 +3.78
    PWRGOOD +4.00 +5.25
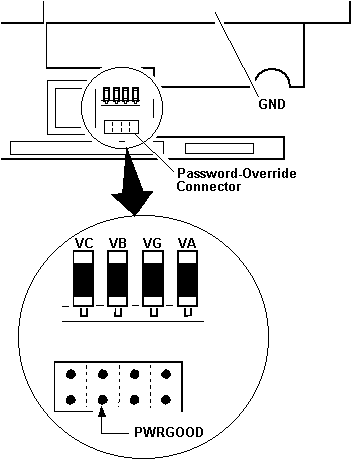


    NOTE: Only VOLT is marked on the system board.  Use the above figure to locate the VA, VG, VB, VC, and PWRGOOD  signal names.

  8.  Power-off the computer and unplug the AC adapter cable  from the computer.
  9.  Check for a short circuit between  GND and VA, VG, VB, or VC.

  10.  Check the output voltage of the AC adapter cable  (see 'Checking the AC Adapter')

  11.  Replace the following FRUs one at a time.


Back to  Jump to TOP-of-PAGE

Please see the LEGAL  -  Trademark notice.
Feel free - send a Email-NOTE  for any BUG on this page found - Thank you.