 |
The recommended
methodology for working with ENOVIA V5 VPM is:
|
 |
To ensure
seamless integration:
- In CATIA, click the Connect User to ENOVIA V5 icon (
 )
to establish the connection between CATIA V5 and ENOVIA V5 VPM. )
to establish the connection between CATIA V5 and ENOVIA V5 VPM.
|
| |
Creating a Product in ENOVIA
At the top level of the ENOVIA product hierarchy is the product class
root. This is the highest entity in a product structure and is used to
group products. Products can be created directly under this level or
under an intermediate level called the product class depending on how you
want to structure your data. It is not necessary to create product
classes, but the product class root and product must always exist. This
is the product that will be sent to CATIA and is mapped to the CATIA
document root.

-
In the ENOVIA home page,
open the Engineering Life Cycle folder and double-click the Product
Classes folder.
-
In the Product Class
browser, click the New Product Class Root
 icon in the topmost toolbar. icon in the topmost toolbar.
-
Enter a meaningful name
for your product class root in the Product Class ID field and then
click Add.
-
Right-click the product
class root you have created and select New > Product.
-
Enter a meaningful name
for your product in the Product ID field and then click Add.
-
Don't forget to click
the Save icon in the topmost toolbar to save the structure
in ENOVIA.

Note that after creating the PCR, you can leave ENOVIA V5 VPM. |
| |
Sending an ENOVIA Product to CATIA
-
To send the product to CATIA:
 |
- In CATIA, click the Connect user to ENOVIA V5
icon (
 )
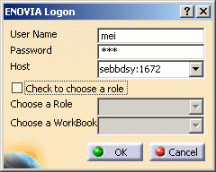
in the ENOVIA V5 toolbar. The ENOVIA Logon dialog
box is displayed: )
in the ENOVIA V5 toolbar. The ENOVIA Logon dialog
box is displayed:
- Enter your User Name, and your password.
- Select a role as well as a workbook and click OK.
|
- Click the Search ENOVIA icon (
 ).
The VPM Search dialog box is displayed. ).
The VPM Search dialog box is displayed.
- In the Objects scrolling list, select the Product
option.
- Enter the Owner's ID.
- Click OK when done. The Product ID is displayed
in the Result window.
- Double-click the product.
- Right-click the root product or the part instances and
select Open. The Open Modes dialog box is displayed.
Leave the default settings and click OK. The CATIA
view is displayed.
|
|
| |
Saving CATIA Data in ENOVIA

-
In the Product Structure workbench of CATIA V5, click
the Save in ENOVIA icon in the ENOVIA V5 VPM Navigator toolbar.
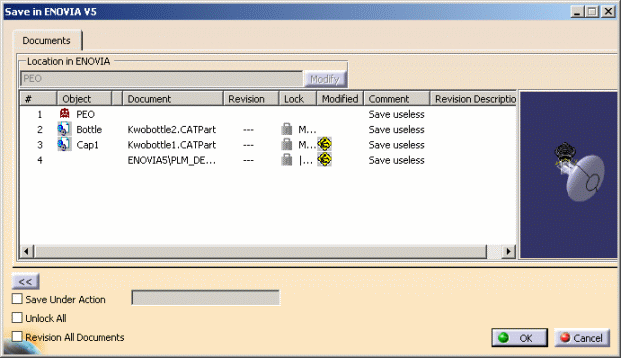
| The Save in ENOVIA V5 dialog box appears showing objects to
be saved and set to the correct save mode and save options. The
dialog box below shows the objects.

|
-
Click OK in the dialog box.
A Save in ENOVIA V5 progress bar lets you monitor the progress of the
operation.
|
| |
If the CATIA Document Root is Not an ENOVIA Product
- Save your work temporarily.
- Create a product class root and product in ENOVIA.
- Send the ENOVIA product to CATIA.
- Insert the components (Insert > Existing Component)
containing the work you saved temporarily above.
- Save your work in ENOVIA.
|
 |
For more
information, see the CATIA / ENOVIA Interoperability User's Guide
and the appropriate ENOVIA V5 VPM guide. |
|
 |


