Creating a Specifications Catalog Manually
|
|
This task shows you how to create a specifications catalog manually, which means it references a parts catalog instead of individual parts.An example from the Piping workbench is used here. The process for other workbenches is the same - simply use the relevant CATfct file and terminology. For instance, in the Tubing workbench you would use Tubing Part instead of Piping Part. | |
|
|
It is recommended
that you use the procedure described in
Creating a Specifications Catalog, which is a more automated
process, to create specifications catalogs. If you do use the procedure
described here, you should not mix the two. Do not use the manual
process described here to modify a specifications catalog created using
the automated process (which uses the Create/Modify Catalog
command). And vice versa. You should take note of an important difference between the two procedures: a specifications catalog that is created with the Create/Modify Catalog command points to individual parts, and does not depend on a parts catalog. A specifications catalog that is created with the manual procedure described in this task points to a parts catalog. The sample specifications catalog included with this application was created using the manual procedure. A specifications catalog allows you to specify which parts can be used for a certain project or part of a project. The parts or the main catalog typically contains all the parts available to you. However, in many circumstances you will only want to use parts that have certain properties - if you are building a system for conveying hot gases under pressure, for instance, you will only want to use pipes and parts that have a certain heat tolerance, are made of certain materials and have a certain pressure rating. You achieve this by specifying in the specifications catalog what the properties should be for the parts you want to use. The specifications catalog will not contain copies of the parts, but when you place parts using it, you will only be able to use parts from the main catalog that meet the criteria you have specified in that specifications catalog. In addition to specifying the properties of parts, you also have to associate rules tables. This application incorporates intelligent design functions. This means that as you design, the application ensures your designing meets certain criteria. These criteria are established by the design rules. For instance, the design rules will match the threaded end of a pipe to the threaded end of a part. (You can overrule the rules if you want.) If you are placing an incompatible part, you will be given a choice of other parts that are compatible in that situation. When you use the provided template to create a specifications catalog you must use all the rules supplied with this application. You can modify them (see Modifying Design Rules) but you cannot add new rules. |
|
|
|
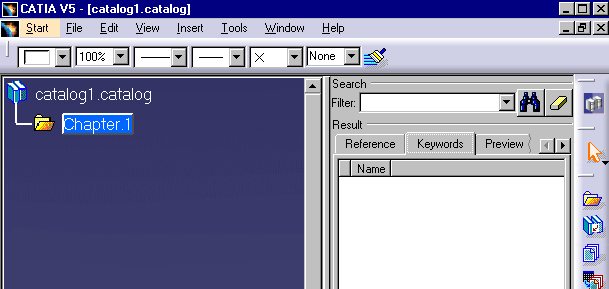
1. | Click Start - Infrastructure - Catalog
Editor to start the Catalog Editor.
|
| 2. | Open the CATfct file associated with your
application. To do this, click the Open User Dictionary button
|
|
|
|
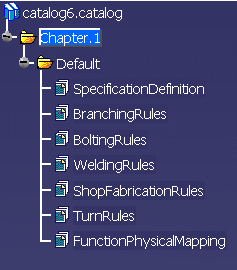
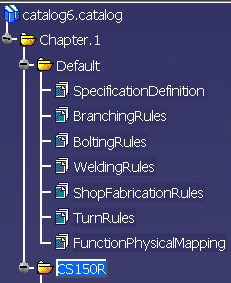
You can add default rules to your specifications catalog. These rules appear in a separate chapter named "Default". The rules in the Default chapter will apply to all specifications that you create. This saves you having to associate rules for each specification that you create. | |
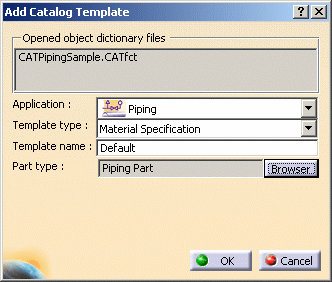
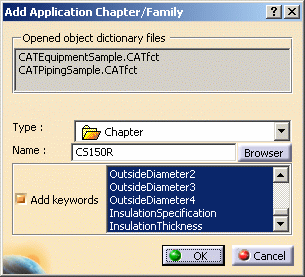
| 3. | Click the Add Catalog Template
button
|
|
| 4. | Select the application (Piping),
and then click on the down arrow in the Template Type field and make your
selection - in this case Material Specification. Enter a name for the
specifications catalog in the Template Name field. If you are creating
default rules you must enter the name Default. Click on the Browser
button next to the Part Type field and make your selection. In this case it
is Piping Part because this is a Piping specifications catalog. Click OK.
The Default chapter and the default design rules display in the
specifications tree.
In applications where you can create both a material specifications catalog and insulation specifications catalog, there may be differences in the design rules that appear in each type of catalog. |
|
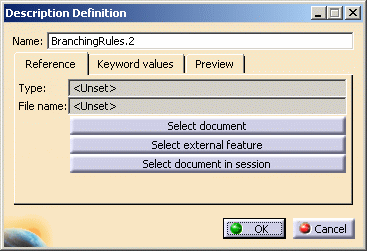
| 5. | You now need
to associate the actual design rules table (which is how design rules are
defined) to each of the design rules in the specifications tree. Double
click on a rule and then click the Add Component button
|
|
| 6. | Click the Select Document
button. In the File Selection box that displays navigate to the directory
where the design rules tables are. They are CATProduct type files. The
default directory is
intel_a\startup\EquipmentandSystems\XXX\Specification (where XXX is
your application) and then the specification itself, say Cs150r. Open the
Cs150r directory and select the table that corresponds to the rule that you
double-clicked, in this case BranchingRules. Click Open on the File
Selection box and OK on the Description Definition box. The table will be
associated with the rule and display in the Catalog Editor.
If you click on the Reference tab you will be able to see the full directory path. |
|
| 7. | Associate all the rules with the corresponding tables using the procedure described above. | |
| 8. |
After you
have associated the rules you can create one or more specifications. To do
this, select the root chapter and click the Add Application Chapter/Family
button
|
|
| 9. | To start adding parts to the catalog. double click on the catalog name in the specifications tree ( in this case CS150R). | |
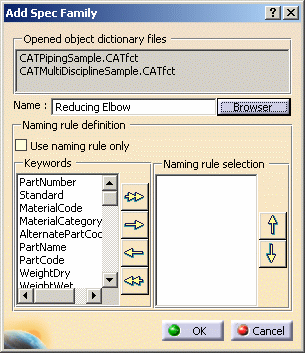
| 10. | Click the Add Spec Family
button
|
|
| 11. | Click the Browser button next to the Name field. The Class Browser will display, listing all the part types, or object classes, in your main catalog. | |
| 12. | Select a part type and click
OK. The part type will be displayed in the Add Spec Family dialog
box, listing all its properties, both local and inherited.
|
|
| 13. | You can choose the naming convention for the
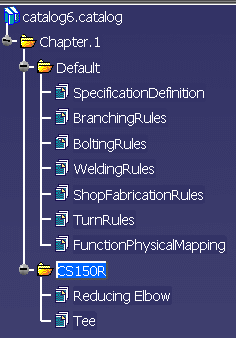
part: Default behavior: If you do not take any of the actions described below, the part name will contain the values of all attributes NOT defined in the filter (query). If you select the option Use Naming Rule Only: Select attributes in the Keywords pane and click the arrow to move them to the Naming Rule Selection pane. All the attributes you place in the Naming Rule Selection pane will be used in the part name. If you do not select the option Use Naming Rule Only: The values of all attributes that are NOT defined in the filter will be used in the part name. In addition, you can select attributes in the Keywords pane and click the arrow to move them to the Naming Rule Selection pane. All the attributes you place in the Naming Rule Selection pane will also be used in the part name. Click OK. The part type Reducing Elbow will be added to the specifications catalog - you will see it appear as a family in the specifications tree.
|
|
| 14. | You have created a specifications catalog that can be used to define a filter. Add as many part types as you want to, then save the catalog. You will now need to define filters for each part type. | |

![]()