|
This task explains how
to create a catalog. The Catalog facility is a standard facility provided
with the V5 Product line. For detailed information regarding
Catalogs, please see the Infrastructure documentation - Advanced Tasks -
Using Catalogs. If you are creating a catalog of resolved parts then it
is recommended that have no more than about 500 documents in each catalog,
so that performance does not suffer. In this case you may need to create
several catalogs. To learn how to do this see
Creating Sub-Catalogs. Catalogs that point to parametric parts are
smaller, and you can have one catalog.
The process for saving your catalog in ENOVIA is given at the end of
this task. |

|
This task explains
creation of the main catalog. Creation of the specifications catalog and
standards is explained elsewhere (not all
applications use them). Also, piping parts are used in this example. The
procedure is the same for other types of parts (tubing, equipment, etc.).
You should be in the workbench (such as Piping Design) for which you
want to create a catalog. |
 |
1. |
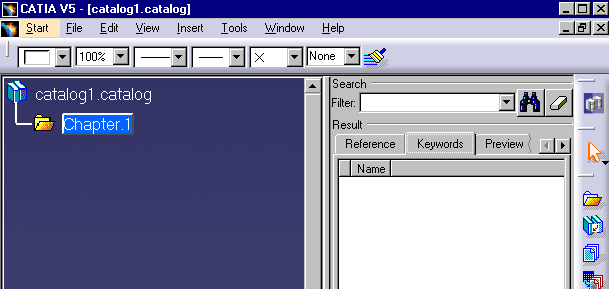
Open the Catalog
Editor by clicking on
Start-Infrastructure-Catalog Editor. The Catalog Window opens
with a basic catalog structure in the left column. Catalogs are created
analogous to books, with the book being at the top level, chapters under
it, and, if necessary, sub-chapters under them, and with pages (or parts)
at the lowest level. Each family contains references to one or more parts.
The illustration below shows the Catalog Editor. The column to the left
is where your chapters and families are displayed. The column to the right
will display parts when you click on a family.

|
|
2. |
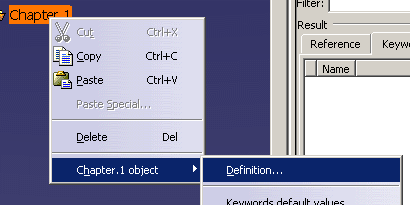
Rename the root chapter (Chapter.1
above) to XXX Part to reflect the application you are working in. In the
case of Piping Design, for instance, it will read Piping Part. If you do
not do this you will have an extra level in the tree. To rename, right
click on it, select Chapter.1 Object - Definition. Enter the new name in
the dialog box that displays.
 |
|
3. |
Select the chapter
under which you want to create the catalog (in this case Piping Part).
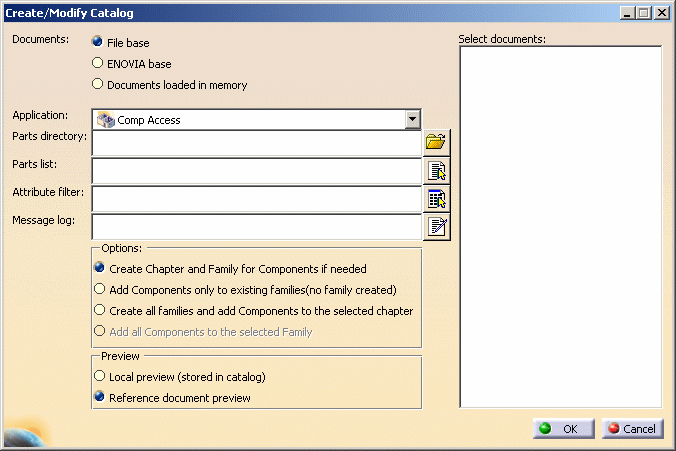
Click the Create/Modify Catalog button
 . The Create/Modify
Part Catalog dialog box displays.
See Modifying a Catalog for an explanation of
the options. . The Create/Modify
Part Catalog dialog box displays.
See Modifying a Catalog for an explanation of
the options.
 |
|
4. |
Select the application in which
you want to create the catalog by clicking the down arrow in the
Application field. |
 |
If you want to add
specific parts to your catalog then create a parts list file with a text
editor. Enter the names of the parts you want to add, each name on a
separate line. This is also the process used in modifying a catalog. The Attribute Filter field can be left blank, it
is not needed for this process. If you want to have a log of the process
then enter a file name in the Message Log field. The file will be created. |
|
5. |
Click the button next to the Parts
Directory field and navigate to the directory where your parts are stored.
The default location is ...intel_a\startup\\EquipmentandSystems\XXX\XXXX\ComponentCatalogs\Parametric,
where XXX\XXX
is the application, such as Piping\PipingDesign.
If you have both a Parametric and Resolved parts directory and you want to
create catalogs for both then you need to run the command twice. Click OK
to begin creating the catalog, which may take a few minutes. A dialog box
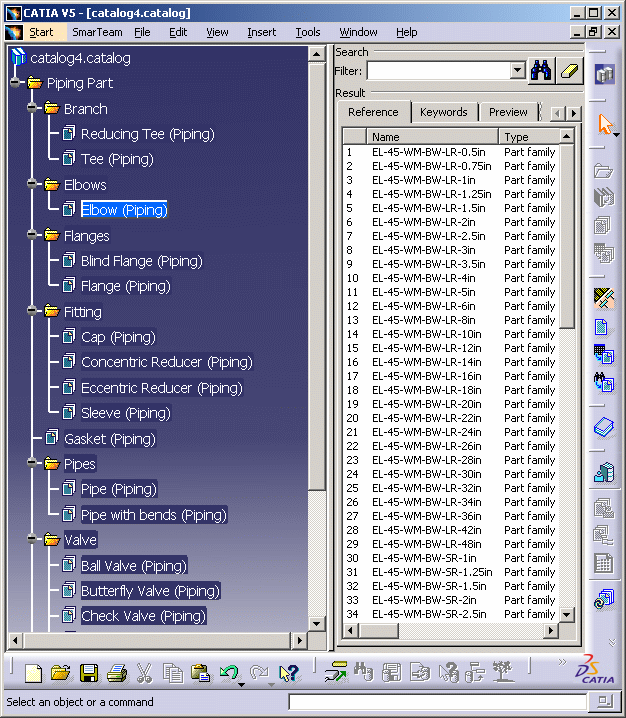
will inform you of the progress. The image below shows part of a Piping
Design catalog.

Chapters and families are displayed in the first column. The second
column will display parts (often called descriptions) when you select a
family. You can display different kinds of information by selecting the
tabs (Reference, etc.) in the second column. The tab Generative Data is
used for specifications catalogs.
The Keywords tab displays the keywords (attributes) associated to the
object. In addition, each chapter may contain one or more keywords created
by the application: as of Release 14 these were three: PartType,
GenericList and ReferenceStatus. These are used by the application for
specific purpose. Do not delete or modify them. |
|
6. |
Save your changes. |

|
You should become familiar with some
of the terminology used with reference to catalogs. In the example above:
- The first entry (catalogX.catalog) is the file name. When you save
the catalog you will give it a file name which will display here.
- Piping Part is the root chapter.
- Branch, Elbows, Flanges, etc., are chapters.
- Tee, Elbow, Blind Flange, etc., are families.
|
 |
To save
your catalog in ENOVIA
Two methods are given below for saving your catalog in ENOVIA. One can
be used when the catalog is small, the other should be employed when you
have a large number of parts.
For a small catalog.
- Open the master catalog.
- Load all the sub-catalogs.
- Load all the parts that are pointed to by the sub-catalog.
- Save all the data in ENOVIA.
For a large catalog (you save each sub-catalog then make the master
catalog by pointing to all sub-catalogs).
To save the sub-catalogs:
- Open a sub-catalog.
- Load the parts that the sub-catalog points to. This can be done using
either Edit->Links or File->Desk commands.
- Save the sub-catalog in ENOVIA. Do this for each sub-catalog.
To link the master catalog to all the saved sub-catalogs:
- Open the master catalog (it should not point to any other catalog).
- Load each sub-catalog from ENOVIA and link it to the master catalog
by using the "Add link to other catalog" command.
- When all sub-catalogs are loaded, save the master catalog in ENOVIA.
|
|
 |


![]()