
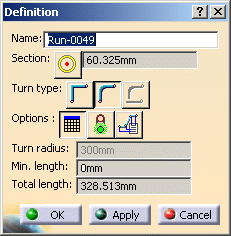
- No Turn: The turn radius for all turns is changed to 0. The Turn Radius field is not displayed.
- Uniform Turn: All turns in the run have the same turn radius.
- Mixed Turn: Turns in the run can have different turn radius.
![]()
|
|
This task gives you an overview of the definition dialog box. You can make modifications to a routable using the functions contained in this box. Specific task-oriented modifications are explained elsewhere in this section. | |
|
|
You should be familiar with the concepts explained in Routing a Run to be able to take full advantage of these functions. Note that some applications, like Systems Routing, do not utilize design rules and the no-rule conditions apply to them. | |
|
|
1. | Right click on a routable and, in the drop down menus that
display, select the routable (in this case Run-0049 object) and then
Definition.
|
| 2. | This brings up the Definition dialog box.
|
|
| 3. | The Name field allows you to change the routable's instance name. | |
| 4. | The Section button lets you change section parameters, as explained in Routing a Run. | |
| 5. | Click one of the Turn Type buttons if you want to change
the turn type.
|
|
| 6. | The Press to Use Rule button
|
|
| 7. | The Display Error Report button is green
|
|
| 8. | The Turn Radius
field displays the turn radius. To change it you need to display the Node
Definition dialog box (see Moving Nodes) and
enter a value. If you introduce an
invalid turn radius, by entering a value in the Node Definition dialog
box, then the Display Error Report button will turn red. (You can also
introduce a turn radius error by shortening the length of one or both
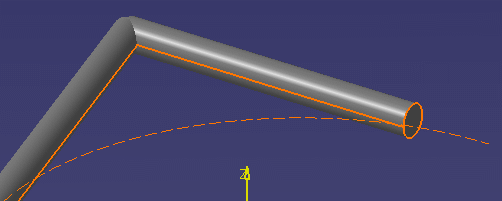
segments.) A red arc will also display on your run. The ends of the arc are
the minimum point to which each segment should be routed for a valid turn.
In the example below, the segment is not long enough to support the turn
radius value entered by the user.
|
|
| 9. | The Node Edit Table button displays a table containing node values - see Moving Nodes. | |
| 10. | The Minimum Length field displays the minimum length of each segment. You cannot change the value in this field if you are using design rules. | |
| 11. | The Total Length field displays the total length of the run. You cannot change the value in this field. | |
|
|
||