![]()
This task explains how to compare two parts or two products to detect differences between them and identify where material has been added and/or removed.
This is useful when comparing assemblies or products at different stages in the design process or when considering internal and external (client) changes to the same product.
![]()
Two comparison modes are available, read the following procedures:
Making a Visual Comparison (default value)
|
|
The comparison is entirely visual. A single view shows the results. |
|
|
Visual comparison offers faster and finer comparison than geometric:
|
|
|
differences between assemblies or products are represented by cubes with separate views showing added and removed material. |
In both modes, you can compare assemblies or products with respect to the absolute axis system in the document (default value), or Local axis systems.
Insert the PEDALV1.model and PEDALV2.model documents in the
DMU Space Analysis samples folder spaug/samples.
![]()
Products or parts you want to compare must be in the same CATProduct document.
Making a Visual Comparison
-
Click the Compare Products
") in the DMU Space Analysis toolbar. The Compare Products
dialog box appears.
in the DMU Space Analysis toolbar. The Compare Products
dialog box appears. 
 By default, Visual Comparison option is selected.
 -
Select one of the products you want to compare (old version), PEDALV1 for example.
-
Select the other product (new version), PEDALV2 for example. The spatial coordinates of PEDALV1 and PEDALV2 are defined with respect to the absolute axis system of the document and are the same.

Note: Multi-selection capabilities are not available in this command.
-
Click Preview to run the visual comparison.
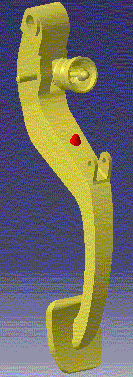
A Visual Comparison viewer opens showing the results:
-
Yellow: common material
-
Red: added material
-
Green: removed material.
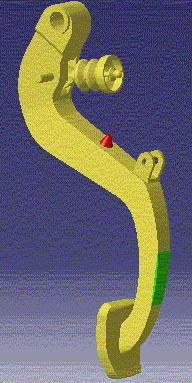

You can re-size the viewer if desired.
Non-selected products in the main document window are placed in low light.
-
-
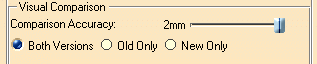
Move the Comparison accuracy slider to the far right and click Preview again.

Visual Comparison Options
Setting Comparison Accuracy
Comparison accuracy corresponds to the minimum distance between two products beyond which products are considered different. A higher value gives a cleaner image.
As you can see, the green area is no longer detected at the higher setting: it is no longer considered different.
The default value (0.4 mm) is twice the default sag value for calculating tessellation on objects. Sag (3D fixed accuracy) is set in the Performances tab of Tools -> Options -> General -> Display.
The default comparison accuracy is the recommended value for visual comparison
Setting Options buttons
-
Both Versions: common material and both versions of the product.
-
Old Only: common material and the old version of the product.
-
New Only: common material and the new version of the product.
Note: You cannot save the results in visual comparison mode. -
Making a Geometric
Comparison
You will run a geometric comparison on the same two products (PEDALV1 and PEDALV2).
-
Repeat Step 2-3
-
Select the Geometric comparison check box.
Geometric Comparison Options
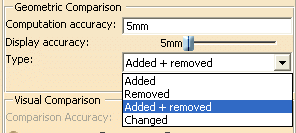
Setting Computation Accuracy
The computation accuracy determines the size of the cubes used to represent the material added and/or removed. A lower setting results in slower computation time, but a more precise calculation of differences.
Setting Display Accuracy
Independently of the computation accuracy, you can set the display accuracy to a coarser display of the computation results to give a better graphics display performance.
By default, the display accuracy is set to the same value as the computation accuracy.
Defining Type
-
Added: Computes differences where material has been added only.
-
Removed: Computes differences where material has been removed only.
-
Added + removed: Computes differences where material has been both added and removed. Differences are displayed in separate views and saved in different files.
-
Changed: Computes differences where material has been both added and removed, displaying all changes in both views and letting you save changes in the same file.
-
-
Set the computation accuracy by entering a value. In our example, we will keep the default value of 5mm.
-
Move the slider to the right to set the display accuracy to 20mm for example.
-
Select the type of comparison you want to run from the Type drop-down list, Added + removed for example.
-
Click Preview to run the geometric comparison: A progress bar is displayed letting you monitor and, if necessary, interrupt (Cancel option) the calculation.A dedicated viewer appears showing the results. Differences are represented by cubes. Added material is shown in red; removed material in green.
")
-
Repeat the comparison adjusting the display accuracy to the same value as the computation accuracy (5mm):
")
-
Repeat the comparison adjusting the computation accuracy to 2mm.
")
Using Local Axis Systems
You will now run a visual comparison using local axis systems.
This option, available in both visual and geometric comparison modes, lets you compare two products defined with respect to local axis systems, irrespective of the position of products in the document.
-
Insert the PEDAL.CATProduct document in the DMU Space Analysis samples folder and click the Compare Products icon again.
-
Select the old version: select PEDALV1 again. The product and its axis system are highlighted in green.
-
Select the New version: PEDALV3. The product and its axis system are highlighted in red.
")
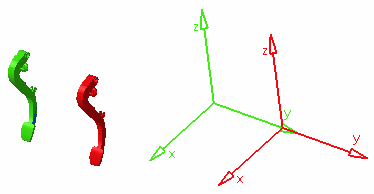
Spatial coordinates of PEDALV1 and PEDALV3 are different when defined with respect to the absolute axis system in the document but are the same when defined with respect to local axis systems. Note that this option is not relevant for local axis systems defined inside a CATPart document. This option only works for axis systems defined on product nodes. 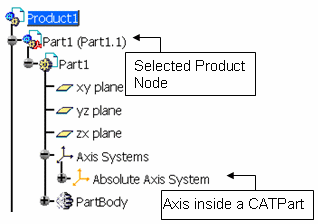
-
Set the comparison accuracy as desired.
-
Select the Use local axis systems check box:

Local axes of the two products are superimposed in the main document window. The old version axis system is the reference axis system.
-
Click Preview to view results in the Visual Comparison viewer. A progress bar is displayed letting you monitor and, if necessary, interrupt (Cancel option) the calculation. Notice that you get the same results as you did when comparing PEDALV1 and PEDALV2: for the purposes of this task, PEDALV3 is a copy of PEDALV2 that has been positioned differently in the document.
-
Click Close when done.
Saving Results
|
In DMU-P2, you can save the displayed results (cubes) in 3dmap format (.3DMap), as a cgr file (.cgr), a Virtual Reality Modeling Language (VRML) document (.wrl) or a V4 model (.model). The 3dmap format can be inserted into a product and other DMU Space Analysis (Clash or Sectioning) or DMU Navigator (Proximity Query) commands run to evaluate the impact of modifications. Colors assigned to added (red) and removed (green) material will also be saved making changes more visible when re-inserted into a document. The Save As dialog box is proposed when you click Save in the Compare Products dialog box:
|
Combining the Compare Products command with
other DMU Space Analysis and DMU Navigator toolbar commands
-
You can use the Measure Between command to make measures, for example between two points, in the Visual Comparison viewer.
-
You can generate a section in the main document window: added and removed material is visible in the generated section.
|
|

-
You can run a query for products immediately surrounding the added material (Proximity Query command in the DMU Data Navigation toolbar) and then analyze for clashes (Clash command). This offers the advantage of letting you, for example, focus on a part of an engine rather than analyzing the whole engine and then having to sift through the results to find those relevant.
![]()