|
This command is only available with the
Generative Shape Optimizer product. |
 |
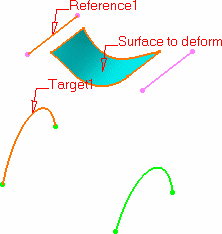
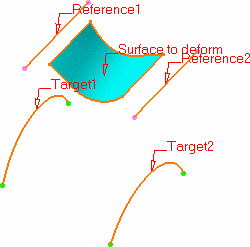
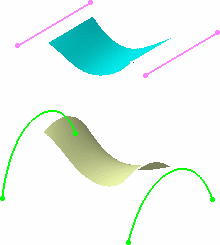
This task shows how to deform surfaces
basing the deformation on curve wrapping, that is matching each reference
curve onto a target curve.
The deformation is then defined by the transformation of the reference
curves into target curves.
The curves used for the deformation do not necessarily lie on the initial
surface. |
| |
|
|
Several cases are presented here, from the simplest one to
cases using various options. Note that whatever information is given in the
first example also applies to the following examples.
|
 |
Open the
WrapCurve1.CATPart document. |
|
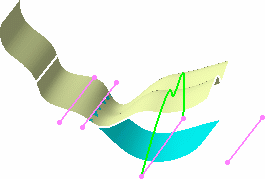
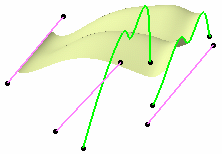
Basic Curve Wrapping Deformation
|
 |
-
Click WrapCurve
 . .
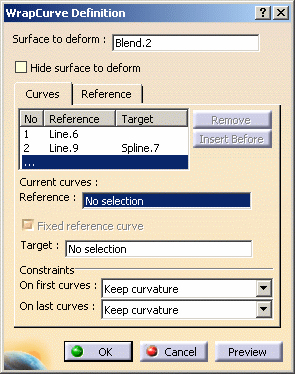
| The Wrap Curve Definition dialog box is displayed. |
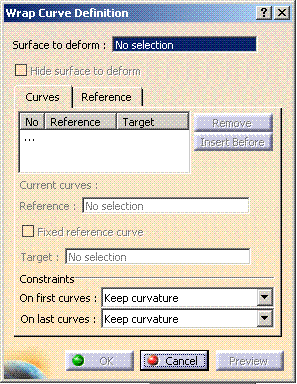 |
-
Select the surface to be deformed.
-
Successively select the first reference curve and the
first target curve.
-
Repeat this operation by selecting the second reference curve then the second target curve.
 |
| As you select pairs of reference/target curves, the curves list
in dialog box is updated accordingly. |
 |
-
Click OK to create the deformed surface.
| The element (identified as Wrap curve.xxx) is added
to the specification tree. |
 |
 |
- You must always select successively a reference then a target
curve to define a pair. You cannot select all reference curves,
then all target curves for example.
- You need to select only one pair of curves (reference and
target) to be able to define the deformation by clicking Preview.
- When several pairs of curves are selected, they must be
ordered, not randomly selected
- Reference curves should not intersect each other, nor should
the target curves should intersect each other
|
| |
|
 |
Reference and target curves can be multi-cells.
Joined, blended, or matched curves, for example, can be used as
reference or target curves. |
|
|
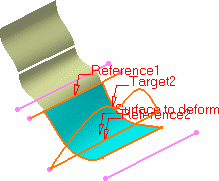
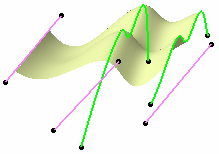
Curve Wrapping Deformation with Fixed Reference
|
|
Some times you need to create a deformed surface in
relation to another element, when you want to match two surfaces for
example. The curve wrapping capability lets you fix an element that can be
used by another one, thus allowing you to retain a connection between
elements while deforming the initial surface. |
|
|
-
Click WrapCurve
.
| The Wrap Curve Definition dialog box is displayed. |
-
Successively select the surface to be deformed, and the
first reference curve
-
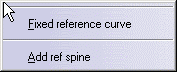
Right-click in space to display the contextual menu, and
choose the Fixed reference curve.
|
The reference curve you selected previously now is
fixed, i.e. you do not need a target curve, this curve being used to
create the deformation.
In the target area of the list, no element is
displayed. |
 |
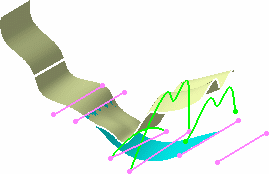
-
Select another pair of reference and target curves and
click Preview.
| A new surface is created based on the first reference curve and
the second target curve. |
 |
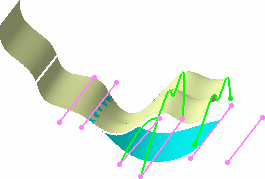
-
Click OK to create the deformed surface.
| Because the first reference curve is an element used by the
blended surface the connection between the two surfaces is retained. |
 |
|
|
Editing a Deformed Surface
|
|
Using the deformed surface you just created, this section
shows you how to modify it by:
|
|
|
-
Double-click on the wrap curve surface you have just
created.
| The dialog box is displayed containing the creation information. |
 |
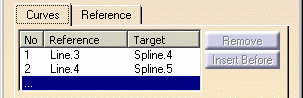
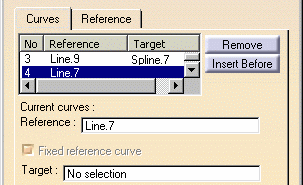
-
Within the list, select the second line (Reference:
Line.9, Target: Spline.7) and click Insert
Before.
| The Reference field of the Current curves
area gets active. |
-
Select a new reference curve (Line.8) and a new target
curve (Spline.6), and click Preview.
| The deformed surface now takes into account the new pair of
curves. |
 |
To add a pair of curves as the last
entry in the list, you need to select the ... line, and
directly select the reference and target curves.
In our example, we selected the ... line, then selected
Line.7 and Spline.8 as reference and target curves respectively. |
 |
| Just like you fixed a reference curve at creation time, you can
do it when editing a wrap curve surface. |
-
Select the fourth line from the list in the dialog box,
and check Fixed reference curve.
| The target curve is automatically removed from the Target
column and field. |
 |
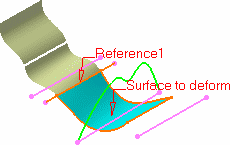
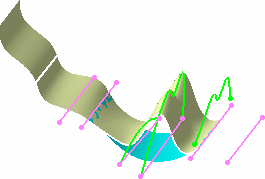
-
Click Preview.
| The resulting surface looks like this: |
 |
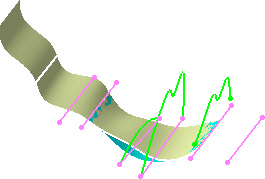
-
Select the third line from the list in the dialog box,
and click Remove, and click OK.
| The selected pair of curves no longer being used to
compute the resulting surface, the latter looks like this: |
 |
| You can define further constraints
on the deformed surface by means of the Constraints
fields. You can choose to retain the initial surface's curvature or
tangency constraint on the
first, and/or last; pair of curves. |
| In case of a curvature or tangency continuity, the
original continuity between the deformed area and the surface outside
the deformation area will be at best kept but may be approximate in
certain cases. |
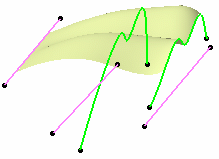 |
| Not keeping initial surface's constraint on
last reference/target curves |
| |
 |
| Keeping initial surface's tangency constraint on
last reference/target curves |
| |
 |
| Keeping initial surface's curvature continuity on
last reference/target curves |
| |
|
|
|
When the spine or the first reference/target curve
(default spine) is too short in relation to the corresponding
surface's bounding box, the curve is extrapolated according to this
bounding box. Then other reference/target curves are extrapolated as
well, in relation to this extrapolated spine. |
|
| |
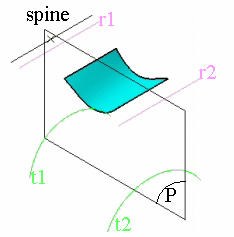
How Is the Deformation
Computed ?
|
|
The following diagrams will help you understand how the
deformation is computed in relation to the entered data, i.e.
reference/target curves and possible spine. |
|
|
 |
|
3D view, where:
- r1, r2 are the reference curves
- t1, t2 are the target curves
- P is a plane normal to the spine
|
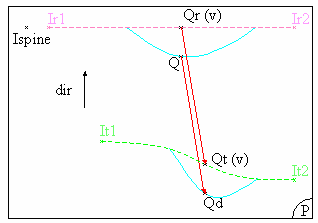
Planar view, where:
- Ir1: is the intersection between P and r1
- Ir2: is the intersection between P and r2
- It1: is the intersection between P and t1
- It2: is the intersection between P and t2
|
| |
|
|
The deformation is computed in each plane P, normal
to the spine. By default the spine is the first reference curve, but you
can select a new spine using the Spine field in the
Reference tab. In each plane P, the system computes the
intersection between the plane and each curve.
A curve (Cr) is created between the first intersection point (Ir1)
and the last intersection point (Irn) on reference curves, passing
through all the intersection points between these two.
Similarly, a curve (Ct) is created passing through all the
intersections points between the first (It1) and the last
intersection point (Itn) on target curves.
Then, for each point Q, resulting from the intersection of the
surface to be deformed with the plane, Q is projected onto the curve
Cr according to the projection direction (dir). This
projection direction is the vectorial product of: vector(lspine, lr2)
^ vector normal to P.
The result of the projection of point Q is the point Qr,
which parameter on Cr is v.
Similarly, a point Qt is created on the curve Ct, with the
same v parameter as point Qr on curve Cr .
Then Qd, that is the transformation of point Q according
to the wrap curve deformation, is obtained by adding: Q+vector(Qr,Qt) |
|
 |