 |
This task explains creation of a deck.
|
 |
In
most cases one entire deck or bulkhead will consist of one plate. However,
in some instances you may want a deck or bulkhead to consist of more than
one plate. |

|
1. |
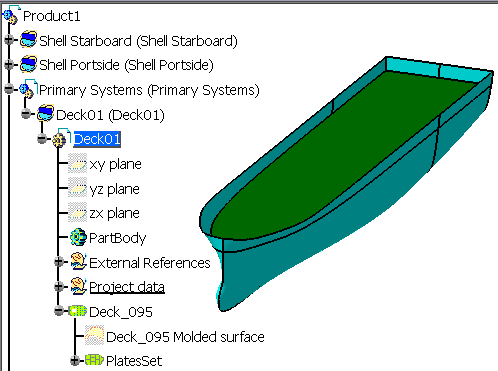
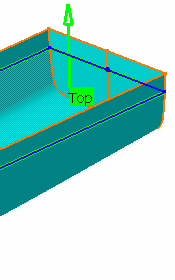
Create an SFD
system under the Primary Systems product (see
Organizing Your Document), rename it if necessary. Select the CATPart
that is created under the system in the specifications tree and go
Start - Equipment & Systems
- Structure Discipline -
Structure Detail Object Design. The image below shows the
specifications tree structure and the completed deck.
 |
|
. |
2. |
Click the
Plate button  to
display the Plate dialog box. The entries are explained below: to
display the Plate dialog box. The entries are explained below:
 |
| |
3. |
CATEGORY:
Click on the down arrow to display the entries - they will include the
last 10 entries that you selected. If Deck is not displayed then select
More to display the Class Browser and make your selection from
that list. |
| |
4. |
NAME: The
application can assign a name to the object you are creating using the
object naming
function if you check the Automatic checkbox. If you want
to assign your own name then uncheck the box and enter a name. |
| |
5. |
SUPPORT: Select an appropriate
support for the deck - once you select a support the deck is placed.
Usually the support is one of the planes (grid), though you can select a
surface also. Your selection displays in the Support field.
NOTE: For a deck, the slope should not be more than 45 degrees. You will
get an error message if you exceed these limits. You will also note that
the plate exceeds the outlines of the hull. This 'excess' is defined by
the bounding box created by your administrator. You will need to 'trim'
it, as explained in Step 7 below.
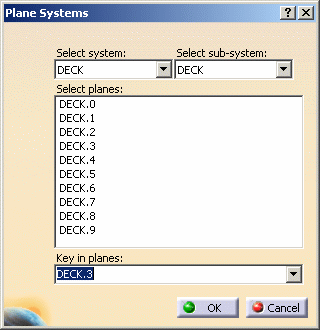
You can also select a support by displaying the
Plane Systems dialog box. Right click on the Support field to
display the Plane Systems dialog box. Select a system or
sub-system by clicking on the arrow, and then select a plane, or you can
key in the plane in the Key in Planes field.
You can select which side of the support you want
the plate thickness applied. The default will be as decided by your
administrator. If you want to override the convention then click on the
arrow that is displayed. The plate will be placed differently from the
default and the arrow will turn red. You can click again to toggle it
back.
Click the button next to the Support
field to display the Elements List. You can use the list to delete or
replace supports that you have added. To replace, select the support,
click the Replace button, then select the new support. |
| |
6. |
OFFSET: Enter
a value in the Offset field if you need it. This is the value
by which the deck will be offset from the support you selected. The value
is expressed in the units selected in your workbench. Enter a negative (-)
sign in front of the value to offset it in the opposite direction. |
| |
7. |
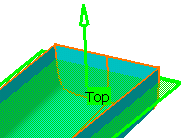
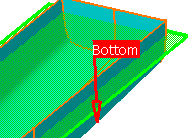
LIMITS: This function trims the
excess plate. You should select the shells to indicate a limit for your
plate. To limit the plate, click under Limits, and select the object you want to use to
indicate the limit. The plate is trimmed, and the selected object displays
under Object.
Under Offset, you can define the offset value of each
plate limit. A positive value adds material. A negative value removes
material.
Additionally, limit tags display in your 3-D session to assist with
plate limit management.
The Remove button allows you to delete a
limit.
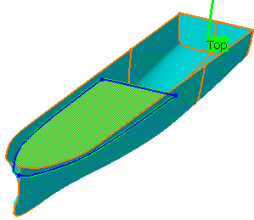
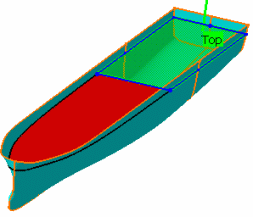
The Switch Side button lets you toggle
between limited sides. In the images below the user is clicking the
Switch Sides button to toggle limited plates. You can also switch
sides by selecting the same limit again.
|
| |
8. |
Click OK
when you have finished. |