You can choose between three different types of light sources: spot, point and directional.
-
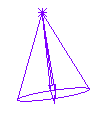
Click Create Spot Light
 to create a light source with a conical shape:
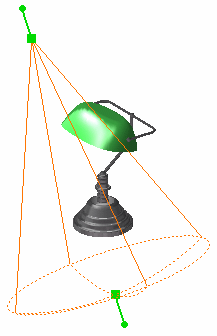

The representation of the light source displayed above corresponds to the default representation mode (i.e. "wireframe display"). You can choose to display the light source in shading mode by selecting the appropriate option in Tools > Options > Infrastructure > Rendering > Display. This light source is located at a given place, emitting the light isotropically inside a cone of influence determined by the privileged direction of illumination (forming the axis of revolution) and the angle that the edge of the cone forms with this axis.
Spot light sources are mainly used to simulate spot light (the most frequently used lights) and are useful for tuning the lighting of each object individually.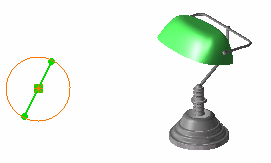
... to create a light source situated at a given point, emitting light isotropically, i.e. in all directions. This light source type is mainly used to simulate light bulb, for instance.
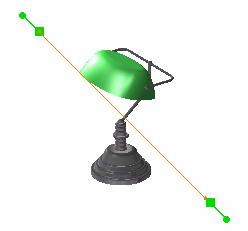
... to create a light source coming from a given direction, generating constant intensity parallel lighting. This light source type is mainly used to simulate a global lighting as the sun does.
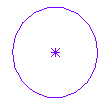
Note: you can click anywhere in the geometry area to see the light symbol:
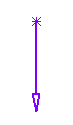
Spot light Punctual light Directional light Direction vector represents the privileged direction of illumination of the source for spot and directional light sources. It is visualized by an arrow whose origin is the anchoring point of the source.
Anchoring point is the position of the light source and is represented by a small star. When the source is characterized by a direction, the anchoring point coincides with the origin of the arrow.
In the case of a spot or punctual light source, the anchoring point physically localizes the source. In the case of a directional light source, it can be used (with the target point) to define the illumination direction. -
As for cameras, you can interactively manipulate the light source:
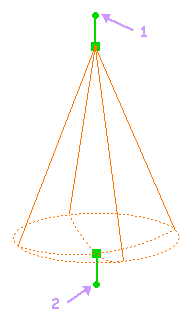
- the source point (1) rotates the spot around its target point
- the target point (2) rotates the spot around its source point
- the upper green manipulator translates and rotates the spot around its target point
- the lower green manipulator translates and rotates the spot around its source point. It also lets you modify the attenuation end.
-
To activate a light source, right-click it in the specification tree then select Light On.
Inversely, to deactivate a light source, right-click it in the specification tree then clear Light On.
More about light sources
Light sources created in the Real Time Rendering workbench are supported in:
Automation
Macros are provided to automate the activation/deactivation of light sources. Refer to the "Use Cases" section in the Real Time Rendering Automation documentation for detailed information.
![]()