-
Select File > New (or click New
 ).
).
The New dialog box is displayed, allowing you to choose the type of document you need. -
Select Part from the List of Types field.
-
Click OK.
Customized Session
The New Part dialog appears if your session is configured as explained in the Customizing chapter of this guide. For more information, refer to the documentation related to the Part Document tab.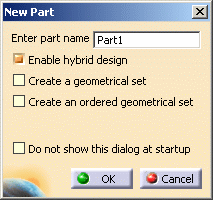
-
Enter the name you want to assign to the part if the default one does not satisfy you.
-
Select the options you need for your design environment.
Hybrid Design
If you select Enable hybrid design, the capability then applies to all the bodies you will create in your CATIA session (and not only to the new CATPart document you are opening). As a consequence, if your session contains CATPart documents already including traditional bodies, the new bodies you will create in these documents will possibly include wireframe and surface elements.
To facilitate your design, we recommend you never change your preferences during your session.
-
Click OK to validate your options and close the New Part dialog box.
The Part Design workbench is loaded and an empty CATPart document opens.If the New Part dialog box does not appear, the Part Design workbench is immediately loaded and an empty CATPart document opens.
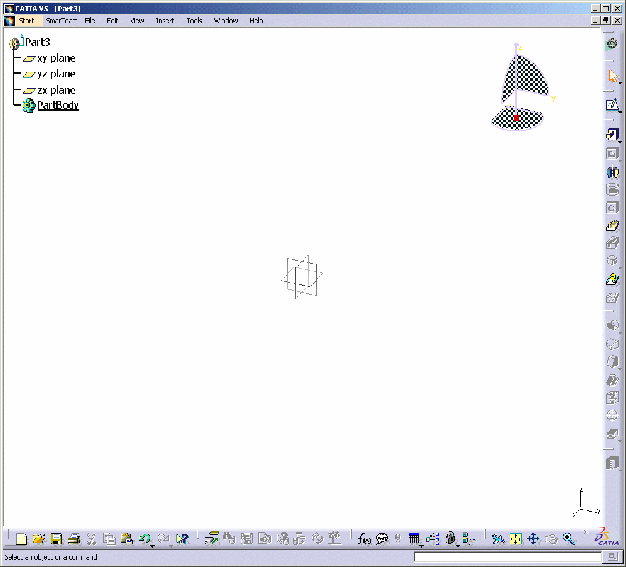
The Part Design workbench document is divided into:
- Specification tree
- Geometry area
- Specific toolbars: for information, refer to Workbench Description.
A number of contextual commands are available in the specification tree and in the geometry. Remember that these commands can also be accessed from the menu bar.
You will notice that the application provides three planes to let you start your design. Actually, designing a part from scratch first require designing a sketch. Sketching profiles is performed in the Sketcher workbench which is fully integrated into Part Design. To open it, just click the Sketcher icon
 and select the work plane of your choice.
 The Sketcher workbench then provides a large number of tools allowing you to sketch the profiles you need. For more information, refer to the Sketcher User's Guide.