
![]()
|
|
This task shows you how to create an area in a project and save it as a separate document. | |
|
|
This function is needed if you want to work on a component of a larger project. If you save the component as a separate document you can open it without having to open the entire project. At the same time it remains part of the larger project. | |
| 1. | Make the parent area active. | |
| 2. | Click the Area
|
|
| 3. | Check the option Create area in new document. This displays a field asking for a file name. | |
| 4. | Enter a file name and create your sub-area.
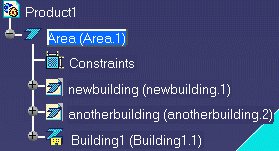
Sub-areas that are saved as separate documents are identified by a unique
icon in the specifications tree. In the image below,
Building1 is not saved as a separate document, whereas
newbuilding and
anotherbuilding have been saved as separate documents.
|
|
| 5. | When you save the document you will be asked if
you want to save other documents. Click OK.
|
|
| 6. | When you need to work on an area which has been saved in a separate document then use the File-Open function and navigate to the directory where you saved the documents. | |
|
|
If you delete one of the sub-areas in a project, then you must also delete the corresponding document from the directory where you saved it. Use the Windows Explorer function for this. | |
|
|
||