The DMU Review can be seen as folder in which applicative data can be organized. The DMU Review is linked to a product structure and only has meaning in the context of that product structure. It can contain:
- a hierarchy of Reviews
- applicative data at any level of the Review hierarchy.
For detailed information on the DMU Review, refer to "About DMU Review" in the Version 5 - DMU Navigator User's Guide.
This working method is relevant for the following objects:
- cameras
- environments (box, sphere and cylinder)
- light sources (spot, point and directional)
- shootings.
In our scenario, we will use the camera as an example but the same method can be used for environments and light sources.
-
In the Product Structure workbench of CATIA V5, click Connect to Enovia LCA
 to establish the
connection between CATIA V5 and ENOVIA LCA.
 -
In ENOVIA LCA, send your document to CATIA. For detailed information, refer to "Sending an ENOVIA LCA Document into CATIA V5" in the Version 5 - ENOVIA/CATIA Interoperability User's Guide.
-
In CATIA V5, access the DMU Navigator workbench then click Create Review
 in the DMU Review Creation toolbar: a review is created and
identified in the specification tree as "DMU Review.n" (if this is
the first review you create, the review will be named "DMU Review.1"):
Note that if no DMU Review is activated, the DMU Review is created at the product root level. -
Double-click the DMU Review you have just created to activate it: the Review is now activated, which you can verify by right-clicking it and noticing the checkmark next to the Review Activated status.
The symbol identifying the DMU Review in the tree is also updated as shown below:

-
Access the Photo Studio workbench then click Create Camera
 to create a camera.
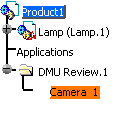
The camera is created in the DMU Review: 
-
Define the camera properties. For detailed information, refer to Creating a Camera.
-
Access the Product Structure workbench again then click Save Data in ENOVIA V5 Server
 to save your CATIA V5 data in ENOVIA.
For detailed information, refer to "Saving an ENOVIA LCA Document from CATIA V5" in the Version 5 - ENOVIA/CATIA Interoperability User's Guide.
![]()