NC Macros
NC Macros in Machining Operations
You can define transition paths in your machining
operations by means of NC Macros. These transition paths are useful for providing
approach, retract and linking motion in the tool path.
You build the macros using the interface provided
under the Macros tab page in the Machining Operation Definition dialog box.
Predefined Macros
You can use predefined macros. These are made up from one or more
paths in a specific order. Just select the desired mode in the Current Macro
Toolbox of the Macros page. You can then adjust parameters of the macro (such
as path length and feedrate).
User-Built Macros
You can also build your own macros using the Build by user mode.
Depending on the context, you can use the following icons to specify macro
paths:
 tangent motion
 normal motion
 axial motion
 circular motion
 ramping motion

 PP word
 motion perpendicular to a plane
 axial motion to a plane
 motion perpendicular
to a line
motion perpendicular
to a line
 distance along a given direction
 tool axis motion
 motion to a point.
Successive PP Words
If the current macro ends with a PP word, PP word
becomes inactive and so you cannot add another successive PP word. For
example in the following sequence of macro paths ending with PPword.2:
...-TangentMotion-PPWord.1-CircularMotion-PPWord.2
you cannot add another PP word directly after PPword.2.
However, you can edit and complete PPWord.2.
Elementary Motions After an Axial Path
If the current macro ends with an axial path (Axial, Axial to a plane,
Axial perpendicular to a plane), the following icons become inactive:
Tangent motion,
Circular motion,
Normal motion,
Ramping motion.
This is because there is insufficient information about conditions such
as tangency or normal to the axial path.
Note that this behavior is not applied to 3-axis surface machining operations
(the icons remain active).
Defining Motion Perpendicular
to a Line
This type of motion is available for most prismatic and axial machining
operations.
Select Motion perpendicular to a line
.
The motion is symbolized in the Current Macro Tool box by a linear
path going to a Line symbol.

Select the Line symbol to display the following dialog box.
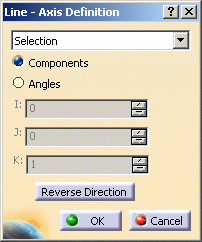
Select the desired method to specify the line orientation from the
proposed list:
- Manual. In this case, choose one of the following:
- Components to define the orientation by means of
I, J and K components
- Angles to define the orientation by means of a rotation
specified by means of one or two angles:
Angle 1 about X, Angle 2 about Y
Angle 1 about Z, Angle 2 about X
Angle 1 about Y, Angle 2 about Z
- Selection. In this case just select a line or linear
edge to define the orientation.
Just click OK to accept the specified orientation.
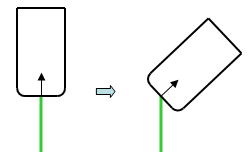
Example:
Motion starts and ends at the same linear location for each machining
level.
Tool Axis Motion
For a ball-end tool, the tool axis motion in the macro is achieved by a rotation around the
center point of the tool. In this case, a small circular arc tool path is
created.

For other tool types, the tool axis motion comprises a rotation around the tip
point of the tool.
Approach Macro
An Approach macro is used to approach the operation
start point. It is available for all machining operation types.
Retract Macro
A Retract macro is used to retract from the operation
end point. It is available for all machining operation types.
Linking Macro
A Linking macro may be
used in several cases, for example:
- to avoid islands in Pocketing operations
- to link two non consecutive paths
- to access finish and spring passes in Pocketing and Contouring operations
- to link points of a pattern in an axial machining operation.
You could specify a Linking macro to do the following:
- Retract along the tool axis at machining
or finishing feedrate up to a safety plane defined by the top plane
plus an approach clearance.
- Approach next path along the tool
axis with approach feedrate.
- The clearance motion between the
retract and approach is along a line in the safety plane at rapid feedrate.
Return on Same Level Macro
A Return on Same Level macro
is used in a multi-path operation to link two consecutive paths in a given level.
For example, you could define
a Return on Same Level macro on a Profile Contouring operation in One Way mode
to do the following :
- Retract along the tool axis at machining
feedrate up to a safety plane defined by the top plane plus an approach
clearance.
- Approach next path along the tool
axis with approach feedrate.
- The clearance motion between the
retract and approach is along a line in the safety plane at rapid feedrate.
Note that no Return on Same Level
macro is needed on a Profile Contouring operation in Zig Zag mode. The motion
between two paths is done at machining feedrate by following the profile of
the boundary.
Return between Levels Macro
A Return between Levels macro
is used in a multi-level machining operation to go to the next level.
You could define a Return between Levels macro to do the following:
- Retract along the tool axis at machining
feedrate up to a safety plane defined by the top plane plus an approach
clearance.
- Approach the next level along the
tool axis at approach feedrate.
- The clearance motion between the
retract and approach is along a line in the safety plane at rapid feedrate.
Return to Finish Pass Macro
A Return to Finish Pass macro is used in a machining operation to go to
the finish pass.
For example, you could define a Return to Finish Pass macro
to do the following:
- Retract along the tool axis at machining
feedrate up to a safety plane defined by the top plane plus an approach
clearance.
- Approach the finish pass level
along the tool axis at approach feedrate.
- The clearance motion between the
retract and approach is along a line in the safety plane at rapid feedrate.
Clearance Macro
A Clearance macro
can be used in a machining operation to avoid a fixture, for example.
You could define a Clearance macro to do the following:
- Retract along the tool axis at machining
feedrate up to a safety plane.
- Approach the finish pass level
along the tool axis at approach feedrate.
- The clearance motion between the
retract and approach is along a line in the safety plane at rapid feedrate.
Angular Orientation Conventions in NC Macros
These conventions concern both Circular and Tangent motions.
For Circular motions
,
position of the circle is defined by the Angular orientation parameter.
For Tangent motion
,
direction of the motion is defined by the Horizontal angle parameter.
The following types of operation are concerned.
Operations with Material Side Defined by the Flank
This concerns the following operations:
Profile Contouring
Pocketing
Multi Axis Flank Contouring
Multi Axis Curve Machining in Side or Tip mode (between two curves or between
curve and surface).
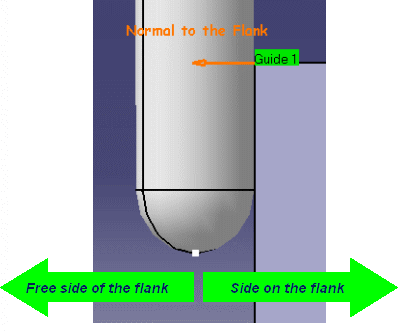
For Circular motion:
Angular Orientation = 0.0 deg => Circle on the free side of the flank
Angular Orientation = 90 deg => Vertical Circle
Angular Orientation = 180 deg => Circle on side to the flank
For Tangent motion:
Horizontal Angle = -90 deg => Motion on the free side of the flank.
Horizontal Angle = 0.0 deg => Motion along Tangent
Horizontal Angle = 90 deg => Motion on side to the flank
Operations with Material Side Defined by the Bottom
This concerns the following operations:
Isoparametric Machining
Multi Axis Sweeping
Multi Axis Contour Driven
Multi Axis Curve Machining in Contact mode.
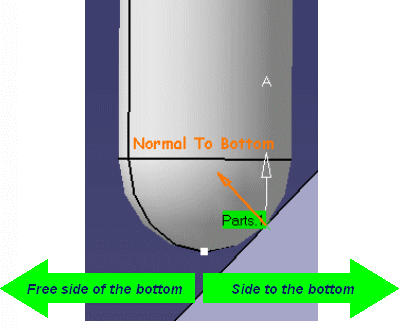
For Circular motion:
Angular Orientation = 0.0 deg => Circle on the free side of the bottom
Angular Orientation = 90 deg => Vertical Circle
Angular Orientation = 180 deg => Circle on side to the bottom
For Tangent motion:
Horizontal Angle = 90 deg => Motion on the free side of the bottom.
Horizontal Angle = 0.0 deg => Motion along Tangent
Horizontal Angle = -90 deg => Motion on side to the bottom.