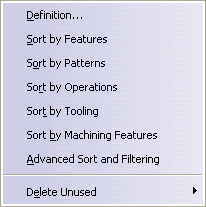
You can delete unused machining features from the Manufacturing View using the following contextual commands:
You can use Delete Unused > All Machining Features to delete all unused machining features. Alternatively, you can delete all unused features of a chosen type (Machining Patterns, Prismatic Rework Areas, , and so on).
The operations to be created will be attached to this feature.
Select the Geometry tab page. This tab page includes a sensitive icon to help you specify the geometry of the hole or hole pattern to be machined.
The icon is updated with this information.
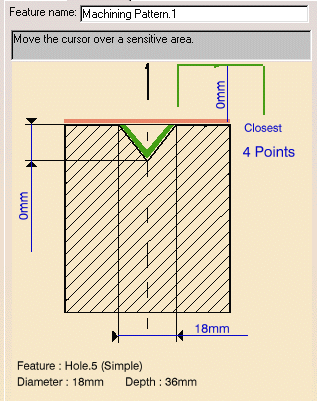
In Geometry tab page of the Drilling dialog box, click the No Points sensitive text in the dialog box, then select Machining Pattern.1 from the displayed list.
If you edit the Machining Pattern.1 (to include more points, for example) both the Spot Drilling and Drilling operations will be updated.
More About the Manufacturing View
Contextual Commands
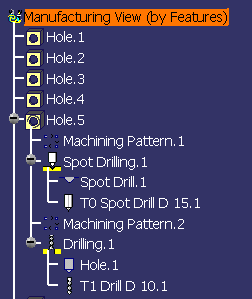
You can use the contextual menu to sort the Manufacturing View by Patterns.
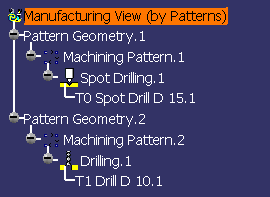
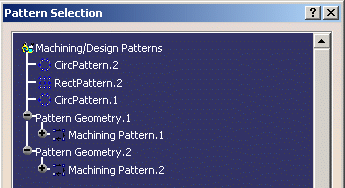
The machining pattern nodes can be expanded to show machining pattern geometry, machining pattern technology, and axial operation information. Right-clicking the machining pattern gives access to contextual commands for copying and creating new patterns.
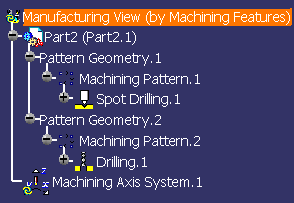
Machining pattern nodes are also displayed in the Manufacturing View sorted by Machining Features.
Parameters, Relations and Formula
If the Part Operation contains parameters, relations or formula, these will be displayed in the Manufacturing View sorted by Features.
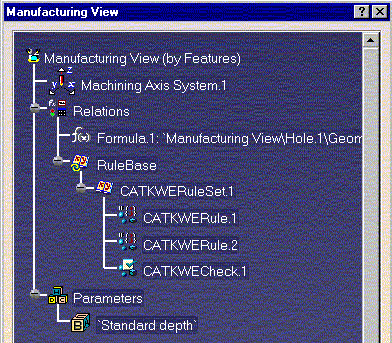
Parameters can be added on machining operations and features in the Knowledge Advisor workbench. In this case the Manufacturing View sorted by Machining Features displays a generic node named Parameters under the machining object node. Under this node the parameter node appears with its name, its value and/or its formula (depending on the Knowledge parameter display setting).
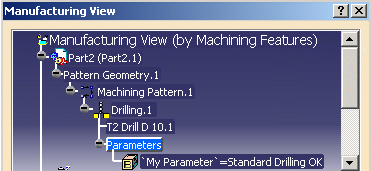
In the Machining workbench, you can edit a parameter by double-clicking it. If a formula has been added on the parameter, you can edit it by double-clicking the parameter, then clicking the f(x) button.
Creating an Axial Machining Operation in the Manufacturing View
When creating an axial machining operation in the Manufacturing View sorted by Machining Features, the behavior is as follows.
Selecting a machining feature and creating the operation:
The operation appears below the machining feature, and it has
one position in its geometry tab.
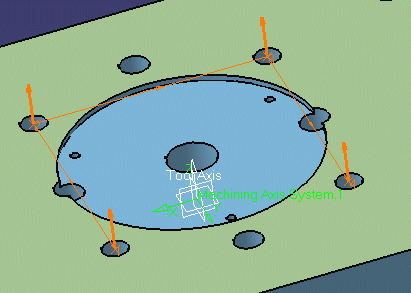
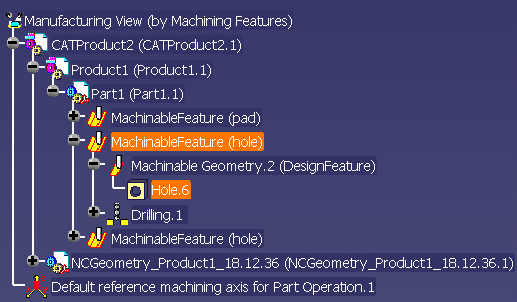
For example, in the view below, the Drilling.1 operation was
created by selecting the MachinableFeature (hole)
node.
Selecting the hole shown below the machining feature and
creating the operation:
Behavior is the same as if the hole is directly selected.
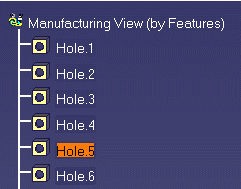
If the hole is patterned, then a machining pattern with several
positions appears in the Manufacturing View and the new operation
appears below that pattern.
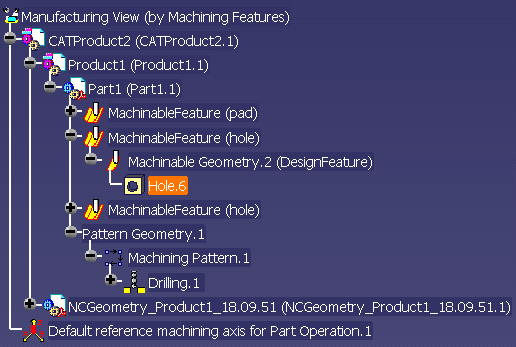
For example, in the view below the Drilling.1 operation was
created by selecting Hole.6 that is part of a 3-hole
pattern. So the operation is created under the Pattern Geometry.1
node.
If the hole is not patterned, then the machining feature
represents that hole and the operation appears below both the
machining feature and the pattern.
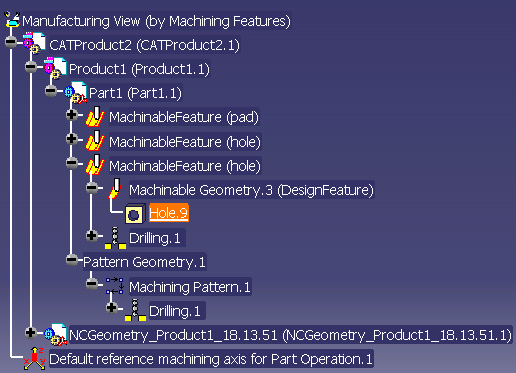
For example, in the view below the Drilling.1 operation was
created by selecting Hole.9 that is not part of a
pattern. So the operation is added below both the MachinableFeature
node and the Pattern Geometry.1 node. It has one
position in its geometry tab.
 Advanced
Sorting and Filtering
Advanced
Sorting and Filtering
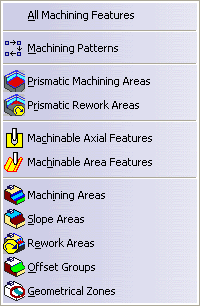
The Advanced Sort and Filtering contextual command lets you sort and filter Machinable Axial Features and Machinable Milling Features by means of the Advanced Sort and Filtering dialog box.
Cumulative sort and filtering capabilities are available based on geometry criteria (Direction, Faces, and Feature Type), machining status (Machined/Not machined), and so on.
Machinable Axial Features are axial features created by Prismatic Machining Preparation Assistant, Machinable Area features created by DPM Machining Process Planner, and Machining Patterns.
Machinable Milling Features comprise Prismatic Machining Area and Prismatic Rework Area features.
Sorting and Filtering Machinable Axial Features
Select Machinable Axial Features Only in the dialog box: the Machinable Axial Features sort and filter options become available.
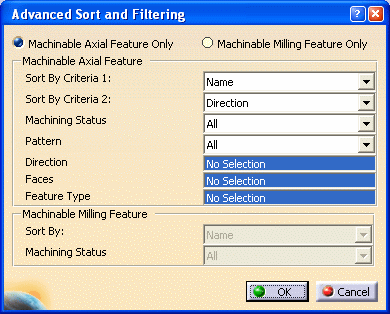
Sort By Criteria 1 and Criteria 2:
There are four sort criteria available and user can apply multiple
sorts (2 sorts) at a time using Sort By Criteria 1 and Sort
By Criteria 2. For Sort By Criteria 1, all four criteria are
available, but for Sort By Criteria 2 all criteria except the
one already selected are available.
- Name: This is the default sorting criteria. If user selects this criterion then all the features are sorted by Name in ascending alphanumeric order (from A to Z).
- Direction: If user selects this criterion then all the features are sorted by direction. While sorting, features closer to Z axis (higher Z values) are given the precedence. If Z value is same for features then features closer to Y axis (Higher Y value) are given the precedence and if Y value is also same for features then features closer to X axis (Higher X value) are given the precedence.
- Face: If user selects this criterion then all the features are sorted based on Face ID in ascending order. Here the face is meant as top face.
- Feature Type: If user selects this criterion then all the features are sorted based on the type value of the feature.
Filter by Machining Status:
- All: This is the default option. If this option is selected then all features are displayed and this filter would not be applied.
- Machined: If this filter is selected then
all features having operations attached to them are shown
in the Manufacturing view.
Note: If there is a pattern to which any manufacturing activity is attached then the all the axial feature in the pattern would also be shown as Machined in Manufacturing View. As the operation is not directly attached to these axial features so user will not see the operation below these features, it can be seen only below the pattern to which directly the operation is assigned. Below the pattern (in sub tree) user can see list of all the axial features inside the pattern. - Not Machined: If this filter were selected then all features having no operation attached to it are shown in the Manufacturing view.
Filter by Pattern:
- All: This is the default option. If this option is selected then all features are displayed and this filter would not be applied.
- Part of Pattern: If this filter is selected then all features, which are part of one or more Machining patterns, are shown in the Manufacturing view.
- Not Part of Pattern: If this filter is selected then all features, which are not part of any Machining pattern, are shown in the Manufacturing view.
Filter by Direction:
In order to apply this filter user needs to specify the direction
criterion. The following options are available in contextual
menu:
- Select by Feature (Default): User needs to select a single feature in manufacturing view and the direction of that feature is used as criteria. All the features having same direction to the selected feature are shown in the Manufacturing View. In this case Pattern would not be selectable because they can have multiple directions. For machinable area features, parameters XDir, YDir and ZDir are used to identify the direction of the feature.
- Select by Edge: User needs to select a single edge on the part and the direction of the edge is used as criteria. All the features having same direction of the selected edge are shown in the Manufacturing View.
- Select by Face: User needs to select a single face on the part and the direction perpendicular to that face is used as criteria. All the features having the direction perpendicular to the selected face are shown in the Manufacturing View.
Filter by Faces:
In order to apply this filter user needs to specify the top
face. All the features in that face are shown in Manufacturing
View. The following options are available in contextual menu:
- Select by Feature (Default): User needs to select a single feature in Manufacturing View and the face of that feature is used as criteria. All the features in the face of the selected feature are shown in the Manufacturing View. In this case Pattern would not be selectable because they can have multiple top faces.
- Select by Faces: User needs to select single/multiple face(s) and those faces are used as criteria. All the features in the selected faces are shown in the Manufacturing View.
Filter by Feature Type:
In order to specify this filter user needs to specify the feature
type.
User can select the feature type by selecting a single feature
from the Manufacturing View. This is the default option. Same
option is also available from contextual menu. All the features
with the same feature type of the selected feature are shown
in the Manufacturing View. In this case Pattern would not be
selectable because they can have features of different feature
types.
Sorting and Filtering Machinable Milling Features
Select Machinable Milling Features Only in the dialog box: the Machinable Milling Features sort and filter options become available.
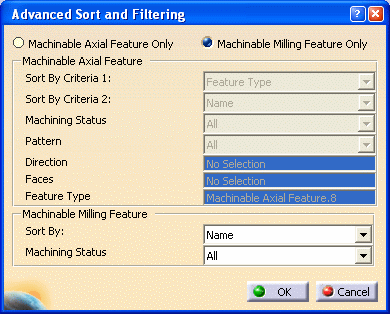
Sort by Name (only available option).
All the features are sorted by Name in ascending alphanumeric
order (from A to Z).
Filter by Machining Status:
- All: This is the default option. If this option is selected then all features are displayed and this filter would not applied.
- Machined: If this filter is selected then all features having operation attached to it are shown in the Manufacturing view.
- Not Machined: If this filter is selected then all features having no operation attached to it are shown in the Manufacturing view.
![]()