
This section provides information about creating turning operations on a 3-axis milling machine that is equipped with a rotary table and facing head. The main objective is to machine large diameter holes using turning techniques, which will give better quality results than milling.
In particular, this section explains how to:
The Part Operation editor allows you to set up the part and the machining environment.
Click Reference Machining Axis System
![]() .
The Machining Axis System dialog box appears for assigning a reference
machining axis system to the part operation. This is similar to the procedure
described in
Insert Machining Axis Change.
.
The Machining Axis System dialog box appears for assigning a reference
machining axis system to the part operation. This is similar to the procedure
described in
Insert Machining Axis Change.
The coordinates of the NC output data will be expressed in this axis system. However, when a local machining axis system is inserted in the program, coordinates will be expressed in the local axis system.
The reference machining axis system should be positioned such that it is Y-axis is collinear with the rotary axis of the machine (B).
Click Product
![]() to associate the part to machine (CATProduct or CATPart) to the part operation.
to associate the part to machine (CATProduct or CATPart) to the part operation.
Other important parameters to set in the Part Operation Editor are:
Click the Machine icon then select the 3-axis with Rotary Table Machine type in the Machine Editor.
In the case of an actual machine with facing head on the shop floor, the
XYZIJK output could be post-processed to pilot the U-axis of the facing head.
The tool mounted on the facing head machines along the profile of the hole.
Note that this information is not specified in the Machine Editor dialog box.
In the Numerical Control tab, select the following sample PP word
table is delivered with the product in
\Startup\Manufacturing\PPTables\TURNING_ON_MILLING_CENTER.pptable
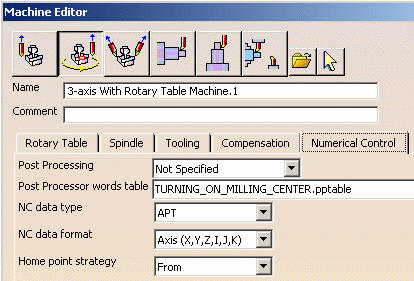
Other important parameters to set in the Machine Editor are:
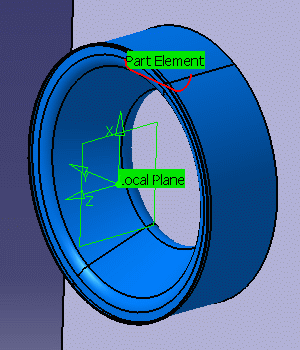
If you specify turning operations on a milling machine, they will be described in the ZX turning plane of the reference machining axis system.
To specify turning operations on a milling machine equipped with a facing
head and rotary table, you must define local machining axis systems. Local
turning planes will be derived from the Z and X axes of these axis systems. The
geometry to machine must lie in the turning plane in order to create the
turning operations.
The figure below shows a local machining axis system with the ZX turning plane
and the selected geometry (Part Element in red) that lies in this plane.
Therefore at each change of turning plane, you must define a local machining axis for turning operations. This is needed for processing geometry and visualizing the tool assembly.
To output NC data in the axis system defining the local plane, you must define a Machining Axis System Change before each turning plane.
A typical program is shown in the figure below:
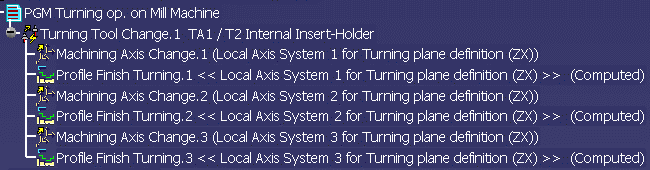
When NC data is generated in XYZIJK format, the IJK components will be the Z-axis of the local plane (see NC Data Output for more information).
Define your turning operations in the corresponding local axis systems, then generate Machine Rotation instructions in the program using the command Generate Machine Rotation command.
A typical program is shown in the figure below:
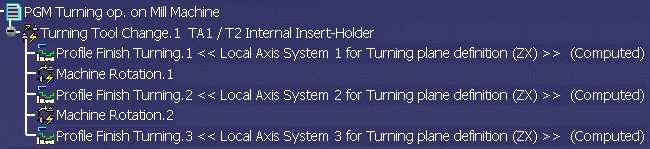
When NC data is generated in XYZIJK format, the IJK components will be the Z-axis of the local plane (see NC Data Output for more information).
You should replay the tool path to check each operation.
You should simulate the material removed by the program. You will need to specify design part and stock in the Part Operation editor.
NC data output can be generated in XYZ or XYZIJK format.
For XYZ data, you must generate table rotations in your program.
For XYZIJK data, the value that is output for IJK is taken on the Z axis
(spindle) of the local machining axis system.
The following NC data statements will be generated at the start of each turning operation:
Using NC_SPINDLE_LATHE:
*START_NC_COMMAND NC_SPINDLE_LATHE

   *START_LIST MFG_SPNDL_UNIT

   RPM ,SFM

   *END

   LOCAL_ORIGIN,%MFG_NCAXIS_X_ORIG,%MFG_NCAXIS_Y_ORIG,%MFG_NCAXIS_Z_ORIG

   $$ SWITCH_FROM_X_TO_U

   SPINDL/%MFG_SPNDL_SPEED,&MFG_SPNDL_UNIT

   *END

   *END
Using NC_LATHE_MO_START_COMMENT:
*START_NC_INSTRUCTION NC_LATHE_MO_START_COMMENT

   *START_SEQUENCE

   LOCAL_ORIGIN,%MFG_NCAXIS_X_ORIG,%MFG_NCAXIS_Y_ORIG,%MFG_NCAXIS_Z_ORIG

   $$ SWITCH_FROM_X_TO_U

   *END

   *END
A typical APT output would be:
$$ OPERATION NAME : Profile Finish Turning.1

   $$ Start generation of : Profile Finish Turning.1

   SWITCH/9

   FEDRAT/ 0.3000,MMPR

   LOCAL_ORIGIN, 0.00000, 130.00000, 0.000000

   $$ SWITCH_FROM_X_TO_U

   SPINDL/ 70.0000,RPM

   GOTO / ...
The Update Input Stock capability is not available for turning operations on milling centers. The corresponding commands are not available in the Part Operation or Turning Operation editors.