
|
Once you have
created a part
and specified a type, you can create one or more graphic representations,
i.e., create the body of the part.
You can define multiple graphic representations when you need to show more
than one graphic of the same component. For instance, you may need to show
a pipe as "double", which is like a 3D version, as "single", which means
represented by a single line, or "envelope", which also includes the
working area needed around the pipe or equipment. These three categories
are included with this application. A fourth category is also included,
"exact", which is normally used for detailed representation and is used
mostly for parts. You can create these three graphics of the same pipe and
place whichever one you prefer in a document.
Before you create multiple representations you should set up a Graphic
Representations file. (See
Understanding Project Resource Management for how to do this.) A
Graphic Representations file allows you to classify each graphic that you
create into a specific category. In addition to the four categories that
come with the application and that were described above, you can create
categories based on your specific needs. |
 |
1. |
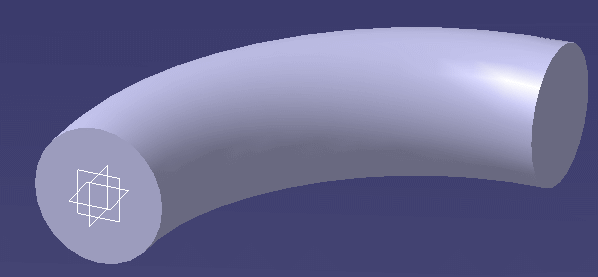
When you create a part as
explained in
Create HVAC part with
specified type, it is given the first classification listed in
your Graphic Representations file. In this example it is Double as shown in
the illustration below. To start making graphic representations for the
part, you will first create a graphic for the Double representation that
you have already created. To do this double click on Elbow1 to
bring up the Part Design product. (Not all users may have a license for
Part Design - contact your system administrator.)
 |
|
2. |
Create your part (in this case an
elbow) using Part Design. (See Part Design documentation if you need help.)
You have now created the Double graphic representation of the part.
|
|
3. |
To create a second graphic
representation, double click on Elbow1 (Elbow1.1) to return to HVAC Design. |
|
4. |
Click on the Build HVAC Part
button
 to display the Create Part dialog box and click on the elbow to make it
active. The buttons at the bottom of the Create Part dialog box will become
active.
to display the Create Part dialog box and click on the elbow to make it
active. The buttons at the bottom of the Create Part dialog box will become
active. |
|
5. |
Click on the Manage
Representations button
 .
The Manage Graphic Representations dialog box will display. .
The Manage Graphic Representations dialog box will display.
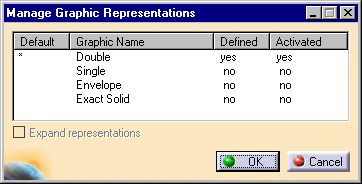
If you are
creating a light part then you will not have a graphic for it. Create a
light part, or open a typed part, and click the Manage Graphics
Representations button. The following dialog box displays.
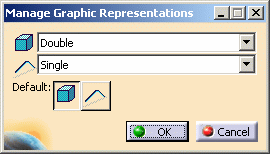
Click on the down arrow to select a name for each of the two
representations. You can also select the default representation that you
want displayed. |
|
6. |
The Defined column shows which
representations exist for the part. If a name has No against it you can
create a representation by clicking on No. It will change to Yes and the
graphic name will be added to the specifications tree. You now need to
create a body for it, as described above. In the illustration below
you can see both double and single representations. The single
representation is the white line running through the 3D elbow.

|
|
|
|
Use the Associate
button to change the name you have already assigned to a graphic
representation. To do this, select the graphic name you want to change to
in the Manage Graphic Representations dialog box, click the Associate
button and select the graphic, either in the viewer or in the
specifications tree. |
|
7. |
After you have added one or more
graphic representations for that part, return to Part Design to create the
graphic, as explained above. |
|
 |