Additional options let you see:
- variable fillets as explained in Identifying Variable Fillets.
- vertex rounds and fillets as explained in Identifying Vertex Rounds/Fillets
- all other faces of the body, which are not colorized using all options, as explained in Setting Background Color.
Open the GettingStarted.CATPart document.
-
Click the Part Analysis icon
 .
.
The Part Analysis dialog box appears.
It is divided into two areas: the left one is dedicated to rounds analysis, the right one to fillets analysis.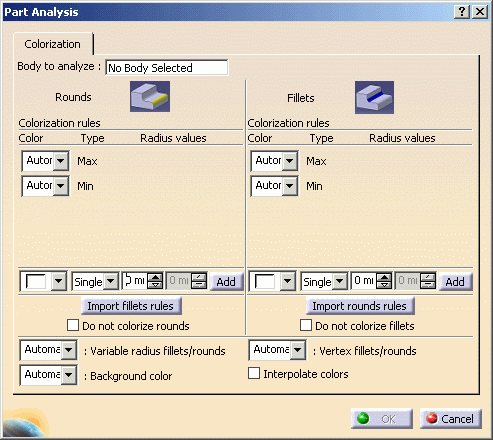
Identifying All Rounds and Fillets at a Time
-
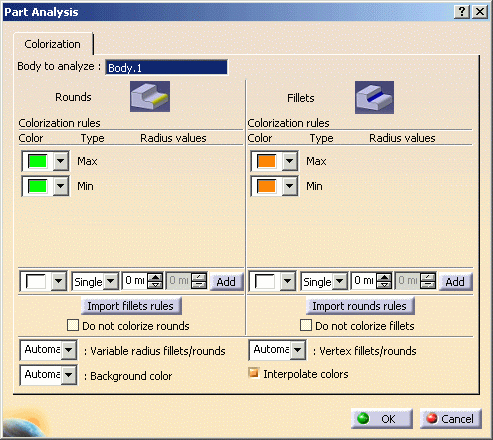
Select Body.1 as the body which fillets and rounds you want to see. You can select it either by clicking on a node of the specification tree, or by selecting one of its face, edge or vertex in the geometry area. Note that only one body can be analyzed at a time.
Body.1 is now displayed in the Body to analyze field.
-
By default, the application displays rounds and fillets in a color valued to Automatic. Automatic means that no rule is applied. It does not mean that colors are changed to default colors. For the purpose of our scenario, set the orange color in the color combo boxes in front of the Max and Min types of the Fillets frame and similarly green color for rounds. By doing this, all rounds then, no matter what their radius values are, will be shown in green and fillets in orange.
-
Check Interpolate colors at the left bottom of the dialog box so that all rounds and fillets get colored.
-
Click OK to compute the results.
An informative window appears, informing you that the body contains 27 fillets and 18 rounds shown below: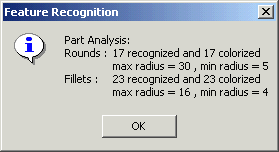
-
Click OK to close the informative window.
All the rounds and fillets of Body.1 are graphically identified by the green or orange colors respectively as shown here: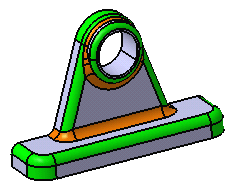
Using the Same Colors for Rounds and Fillets
If you wish to use the same colors for rounds and fillets, you just need to define the colors for rounds (if the default color is not satisfactory) and then select the Import Rounds Rules option.
Identifying All Rounds (or Fillets) Only
-
Now, if you wish that only rounds should be colorized, click the Part Analysis icon
again. -
Select the Do not colorize fillets option in the Fillets frame if you want to identify only rounds or vice versa.
-
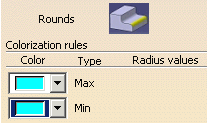
To improve the visualization of rounds, change the grey default color to blue for example. To do so, set the light blue color in the color combo boxes in front of the Max and Min types. By doing this, all rounds, no matter what their radius values are, will be shown in blue.
-
Check Interpolate colors option ON, so that all rounds get colored.
-
Click OK to compute the results.
A window appears, informing you that the body contains 27 fillets and 18 rounds. -
Click OK to close the informative window.
All the rounds of Body.1 are graphically identified by the light blue color you set: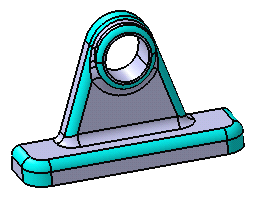
 To
know how to display the different categories of fillets and rounds
according to their different radius values, refer to
Analyzing the Fillets and Rounds of a Part.
To
know how to display the different categories of fillets and rounds
according to their different radius values, refer to
Analyzing the Fillets and Rounds of a Part.Identifying Variable Fillets
To colorize variable radius fillets, you need to set color of corresponding control for variable radius rounds/fillets and vertex rounds/fillets as shown below:

Identifying Vertex Rounds/Fillets
To colorize variable radius fillets, you need to set color of corresponding control for variable radius rounds/fillets and vertex rounds/fillets as shown below:

Setting Background Color
All other faces of the body, which are not colorized using all options are colorized with this background color. The option to set this background color is available at the end of the dialog box, as shown below:
