This task shows you how to edit knowledge formula in the Advanced Meshing Tools workbench using contextual menus.
To do this, you can use several contextual menus available with the following functionalities of the Advanced Meshing Tools workbench:
- Beam Meshing
- OCTREE Triangle Mesh
- Surface Mesher
- Global Parameters
- Geometrical Specifications (External Curve and External Point)
- 1D Mesh Specifications (all except for Propagation Distribution)
- 1D Mesh Specifications (all except for Minimal Mesh Method)
- Advanced Surface Mesher
- Global Parameters
- Imposed Elements (Specifications and Modifications)
- Domain Specifications
- Remesh Domain
- OCTREE Tetrahedron Mesh
- Tetrahedron Filler
- Sweep 3D
- Transformations and Extrude Transformations
- Connections Mesh Parts
For more details about the formula edition, refer to Infrastructure User's Guide - Advanced Tasks - Using Knowledgeware Capabilities - Parameters and Formulas.
Open the
Sample06.CATAnalysis from the sample directory.
In this particular example, you will work with the global parameters of the
advanced surface mesher.
-
Double-click the Advanced Surface Mesh.1 object in the specification tree under the Nodes and Elements set.
The Global Parameters dialog box appears.
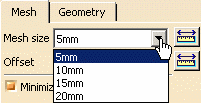
In this particular example, you will work with the Mesh size option in the Mesh tab:

-
Right-click the Mesh size input field.
You access the following contextual menus:
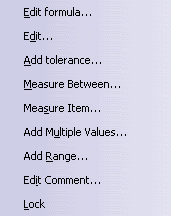
- Edit formula...: lets you modify a formula using the Formula dialog box.
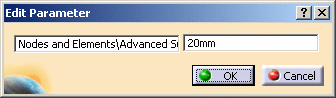
- Edit...: lets you modify a parameter value using the
Edit Parameter dialog box:
- Add tolerance...: lets you specify a Maximum
tolerance value and a Minimum tolerance value
using the Tolerance dialog box:
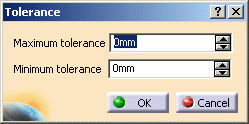
After adding a tolerance, you can modify it (Tolerance > Edit... contextual menu) or delete it (Tolerance > Suppress contextual menu).
- Measure Between..: lets you use the Measure
Between functionality using the Measure Between dialog box.
For more details, refer to Measuring Distances between Geometrical Entities. - Measure Item...: lets you use the Measure Item
functionality using the Measure Item dialog box.
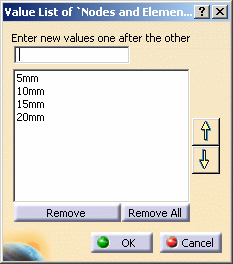
For more details, refer to Measuring Properties. - Add Multiple Values...: lets you create a list of
values using the Value List dialog box.
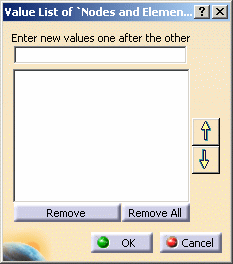
You can enter several values to create a list of values.
After creating a list, the Update Values... contextual menu is available to let you modify or delete the list.
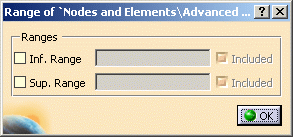
- Add Range...: lets you specify lower and upper
bounds using the Range dialog box.
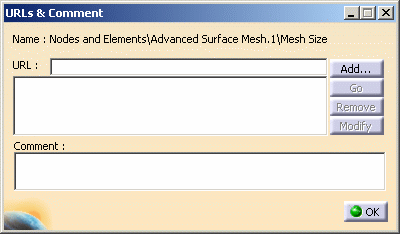
- Edit Comment...: lets you add a comment and
associate a URL to a parameter.
- Lock: lets you lock a parameter.
After locking a parameter, you can unlock it (Unlock contextual menu).
Some of the contextual menus are still available even if the parameter is locked.
-
Select the Add Multiple Values... contextual menu.
The Value List of Nodes and Elements dialog box appears.
-
Enter different values to create a list of mesh size values.
In this particular example, enter 5, 10, 15, 20 as mesh size Value (press Enter after entering a value).
The Value List dialog box appears as shown below:
-
Click OK.
A list of values is now available to set the mesh size value in the Global Parameters dialog box.
-
Select 15mm as Mesh size value.
-
Right-click the Mesh size list and select the Lock contextual menu.
The Mesh size field is locked, you cannot modify the Mesh size value.

-
Click OK in the Global Parameters dialog box.
-
You can launch the mesh operation.