 |
This task shows you
how to create tolerancing captures with different names.
The task deals with :
|
 |
Open the
Annotations_Part_05.CATPart document.
Create a tolerancing capture with capture name A. |
|
|
Naming a Tolerancing Capture
|
 |
-
Click Capture
 in the Capture
toolbar.
|
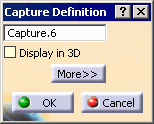
The Capture Definition dialog box appears. |
 |
-
Enter the name of the capture as A.
The name given is checked with the renaming rules set in Tool >
Options > Infrastructure > Part Infrastructure,
Display tab, Checking Operation When Renaming
field.
Depending on the option selected captures with same name will be created
or renamed to another name.
-
If the No name check option is
selected, no
checks are done on capture name and capture will be created with the
given name.
In this case the capture is added to the specification tree with the
name as A.
-
Under the same tree node
option is selected. The capture name is checked, to see if the name given to the
capture is already utilized by other capture in the same capture node of
current annotation set node. If there is a name conflict then following
warning message is displayed.
In this case if you create a capture with name
as A, the warning message is displayed.
-
Similarly if the In the main object
option is selected, then the capture name is checked to see if the name
given to the capture is already utilized by other features of the active
part, product or process. If there is a name conflict then the same
warning message is displayed.
In this case if you give the capture name as Front
View.1, the warning message is displayed.
|
 |
In the Process and Product context, the name check will
not be done against the features in the sub-level parts or
products. |
-
Click OK in the warning message. The
control returns to the Capture Definition dialog box.
Enter a new name for the capture to continue.
Enter the capture name as B. Click OK.
The capture is added to the specification tree.
|
|
|
Renaming a Tolerancing Capture
|
 |
-
Right-click the capture in the specification tree to
display the contextual menu, select Properties,
Feature Properties tab, Feature Name
field to rename the capture.
-
Rename the capture A in the
specification tree to capture B.
The name given is checked with the renaming rules set in Tool >
Options > Infrastructure > Part Infrastructure,
Display tab, Checking Operation When Renaming
field.
Depending on the option selected, the capture will be
renamed to the given name or another name.
-
If No name check option is selected,
then no checks are done on capture name and capture will be renamed to
the given name.
-
Under the same tree node
option is selected. The capture name is checked, to see if the name given to the
capture is already utilized by other capture in the same capture node of
current annotation set node. If there is a name conflict then following
warning message is displayed.
Click OK
in the warning message. The capture gets renamed
to B.Renamed.
The capture follows the renaming XX.RenamedN, where XX is the name of
the capture and N is the extension number which is automatically
assigned.
If you rename another capture to B, then it will be renamed to
B.Renamed1.
-
Similarly if the In the main object
option is selected, then the capture name is checked to see if the name
given to the capture is already utilized by other features of the active
part, product or process. If there is a name conflict then the same
warning message is displayed.
In this case if you give the
capture name as Front View.2, the warning message is displayed.
Click OK in the warning message. The capture
gets renamed to Front View.2.Renamed.
If you rename another capture to Front View.2,
then it will be renamed to Front View.2.Renamed1.
 |
In the Process and Product context, the name check
will not be done against the features in the sub-level
parts or products. |
|
![]()