- A restricted area annotation allows user to define a delimited surface to be toleranced.
- The restricting area and the restricted area may consist of several elements.
- A restricted area cannot be created on a curved surface.
- The surface may be defined using Generative Shape Design workbench.
- To customize the restricted area options, see Display.
- Improve the highlight of the related geometry, see Highlighting of the Related Geometry for 3D Annotation.
-
Click Restricted Area
 in the Geometry for 3D
Annotations toolbar.
in the Geometry for 3D
Annotations toolbar.The Restricted Area dialog box appears. 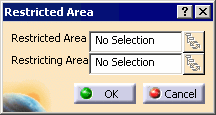
-
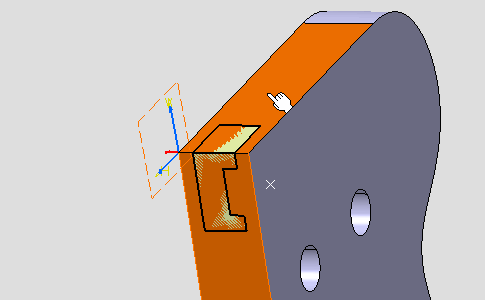
Select the two restricted surfaces as shown on the part.
- The Restricted Area field is updated, the
Geometry Connection Management icon
 becomes available, see Managing
Annotation Connections.
becomes available, see Managing
Annotation Connections. - You can use the Connection Management to add/remove/replace/rename elements of the selection and manage the impacts of these modifications.
- You can select as many elements as you want for each
area, either from the specification tree or from the graphic area.
Picking an element twice does not deselect it.

- The Restricted Area field is updated, the
Geometry Connection Management icon
-
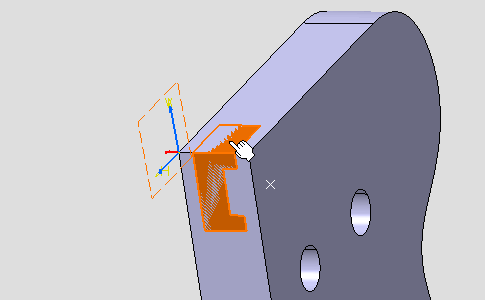
Place your cursor in the Restricting Area field to validate the selection of the Restricted Area elements.
-
Select the two restricting surfaces as shown on the part.

-
Click OK to validate these selections and create the restricted area.
The Restricted Area.1 is created in the specification tree. 

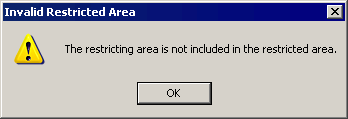
- When a restricted area is not valid, a yellow filled circle
is displayed on the icon in the specification tree.
Right-click the restricted area in the specification tree and select Diagnostic Report from the contextual menu. - When the restricting elements are not included
in the restricted elements, a message is
displayed:
- You can edit a restricted area:
- double-click RestrictedArea.1 in the specification tree.
- the Restricted Area dialog box is displayed.
- you can only select the Connection Management icons or OK or Cancel.
- Modifications made with the Connection Management cannot be undone.
- When a restricted area is not valid, a yellow filled circle
is displayed on the icon in the specification tree.