This operation may prove useful in the context of the configuration management in ENOVIA: if you want to manage the effectivity at a more detailed granularity level. Refer to Split and Transfer Usage.
Use the data generated in the Split scenario.
| It looks like this: |
|
|
![]()
-
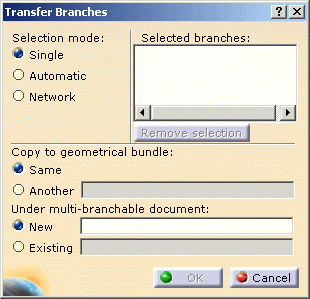
The Transfer Branches dialog box opens: 
It lets you choose: - the selection mode
- Single: you manually select the first branch to
transfer.
once the first branch is selected, the other branches that can be selected must belong to the same multi-branchable document as the first one. - Automatic: select the branch to transfer. It automatically selects all the branches connected to the closest extremity of the first selected branch.
- Network: select the branch to transfer. It automatically selects all the branches connected to the first selected branch.
- Single: you manually select the first branch to
transfer.
- the branches to transfer:
- Select the branches in the geometry or in the specification
tree.
All the branches selected are listed, according to the selection mode. - To remove a branch from the list, select it and use Remove Selection.
- Select the branches in the geometry or in the specification
tree.
- the transfer destination.
- Copy to geometrical bundle:
- Same: the branch is transferred in the same geometrical bundle.
- Another: select the geometrical bundle in
which you want to transfer the branch.
It must be created before the transfer.
For a branch covered with a protection: - A new protection document is created having the same attributes of the protection covering the source branches.
- An instance of this new protection is created under the destination geometrical bundle covering the newly transferred branch.
- The old protection is deleted.
- Under multi-branchable document:
- New: the multi-branchable document is created on-the-fly.
- Existing: select the multi-branchable document.
- Copy to geometrical bundle:
Note that OK remains unavailable as long as no multi-branchable document has been selected.
- the selection mode
-
Choose the Selection mode, Automatic for example.
-
Select one or more branches you want to transfer: Branchable.1.1 for example


CATIA finds the branch(es) connected to the closest branch point according to the selection point. -
For the transfer destination:
- copy to the same geometrical bundle: keep Same
- under a new multi-branchable document: select New.
-
Click OK to validate.
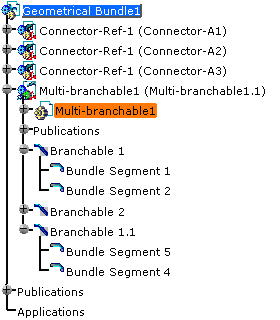
Branchable.1.1 is transferred under a new multi-branchable document.
The result looks like this:

