-
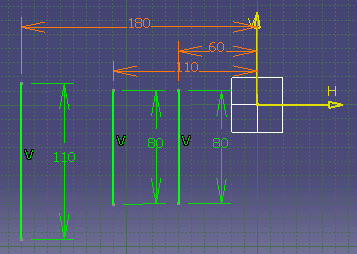
Select the profile to be constrained.
The Auto Constraint dialog box is displayed. The Elements to be constrained field indicates all the elements detected by the application after selecting the profile.
-
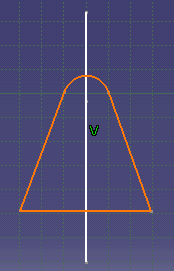
Click the Symmetry lines field and select the vertical line in the geometry area.
All the elements in the profile that are symmetrical to the Line will be detected.
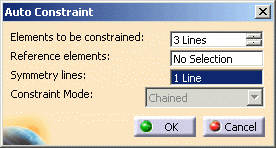
The Reference elements option allows you to select references to be used to detect possible constraints between these references and the elements selected. Once the profile is fully constrained, the application displays it in green.
To know how to use the Constraint mode, refer to Stacked and Chained Modes.
-
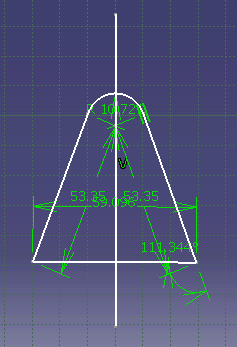
Click OK to constrain the sketch including the profile and the vertical line and, if needed, modify the location of the constraints.
The different constraint created are:
-
Parallelism
-
Symmetry
-
Tangency
-
Radius
-
Angle (two constraints)
-
Offset (two constraints)
The sketch is not displayed in green because it is not constrained in relation to external elements (edges, planes and so on).
Stacked and Chained Modes
When using the Auto-constraint command, there are two ways of considering what a reference is.
- You can decide that the element you explicitly select as the
reference is not an absolute reference, which means that this element is
used only once, just to compute the first constraint. Then, the system
reuses the constrained element as a reference in turn, to compute the
next constraint and so on. If you choose this computation mode, you then
need to set the Chained constraint mode.
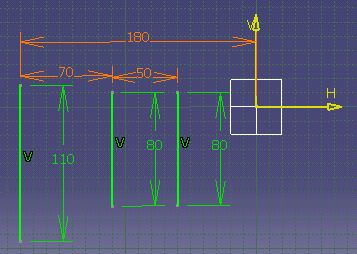
In the following example, V axis is used as the first reference and it is used just once. You can notice that the other two offsets (70 and 50) are computed in relation to the lines.
The picture shows them in red:
- If you decide that the element you select as the reference is an
absolute reference for all the constraints that will be detected, you
need to specify this by setting the Stacked constraint mode.
In the following example, because V axis is set as the absolute reference, all offset constraints requiring a reference element are computed in relation to V. The picture shows them in red: