- change the standard, sheet style and orientation of a sheet. Doing this amounts to modifying the options you selected in the New Drawing dialog box when defining the sheet. Refer to Defining a Sheet for more information on the various options and on what you need to know when defining or modifying a sheet.
- update the standard (in case the current standard file has been modified).
- insert the background view from another drawing sheet.
Changing the standard, sheet style and orientation of a sheet |
|
-
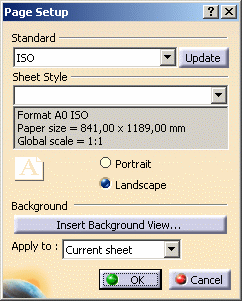
Select File > Page Setup from the menu bar. The Page Setup dialog box is displayed.
-
Select the select the ANSI standard. A message informs you that this action cannot be undone.
The parameters of the chosen standard are copied into the drawing and replace the previous parameters. This may have an immediate impact on the appearance of the elements inside the drawing.

-
Styles are not affected by this change, that is styles in this standard file that are different from the previous standard file will not be re-applied to existing elements. Indeed, styles are applied when creating elements (as they define the default values to be used for creation). If needed, style parameters can be re-applied to an element using the Style toolbar: simply select the element whose style you want to update and select the updated style in the Style toolbar.
-
Sheet styles are re-applied to existing sheets when you are switching to another standard.
-
-
Click OK to continue. The A ANSI sheet style is automatically selected. Among other things, the sheet style defines the sheet format, size, scale and default orientation.
-
Optionally choose another sheet style if you wish.
Another way to change the sheet style (also called format) is through the Properties dialog box: to open it, right-click the sheet, and select Properties. -
Optionally change the default orientation from Landscape to Portrait.
-
Click OK to validate and exit the dialog box. The sheet is modified accordingly.
Updating the standard |
|
|
|
Performing this task requires that your standard file has modified by the administrator. |
|
|
When a standard file is modified by the administrator, there is no automatic update of the sheets which use this standard. Each sheet contains a copy of the standard it uses, and retains this version until you explicitly update this copy or change the standard as explained previously. |
-
Select File > Page Setup from the menu bar. The Page Setup dialog box is displayed.
-
If your standard file has been modified by the administrator, click the Update button. A message informs you that this action cannot be undone.
-
Click OK to continue. The most recent version of the standard file in the sheet, thus reflecting the latest changes performed by the administrator.
-
The most recent version of the updated standard is copied into the drawing and the previous standard parameter values are replaced by the latest ones, reflecting the latest changes an administrator or user may have performed in the standard file. This may have an immediate impact on the appearance of the elements inside the drawing.
-
Note that styles are not affected by this update, that is styles modified in the updated standard file will not be re-applied to existing elements. Indeed, styles are applied when creating elements (as they define the default values to be used for creation). If needed, new style parameters can be re-applied to an element using the Style toolbar: simply select the element whose style you want to update and select the updated style in the Style toolbar.
-
-
Click OK to validate and exit the dialog box. The sheet is modified accordingly.
Inserting the background view from another sheet |
|
-
Select File > Page Setup from the menu bar. The Page Setup dialog box is displayed.
-
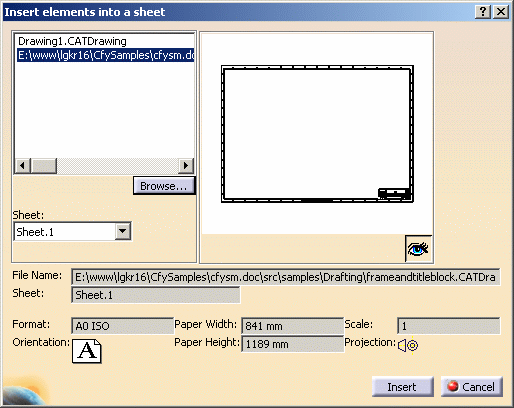
Click the Insert Background View... button. The Insert elements into a sheet dialog box is displayed.
-
Click the Browse... button. The File Selection dialog box is displayed.
-
Browse to the
online\cfysm_C2\samples\Draftingfolder for CATIA andonline\cfysm_D2\samples\Draftingfor DELMIA (in the documentation installation folder) and select the frameandtitleblock.CATDrawing document. -
Click the Open button. The background view you are about to insert in the sheet is previewed.
-
Click Insert to validate and exit the dialog box.
-
Back in the Page Setup dialog box, make sure that Current sheet is selected in the Apply to: drop-down list.
In the case of a drawing containing several sheets, you could insert the background view in all the sheets by selecting All sheets in the Apply to: drop-down list. -
Click OK to validate and exit the dialog box. The background view is inserted in the sheet.
|
|
If you insert a background view which contains a text with an attribute link, note that the text attribute loses its associativity to the 3D, and you need to isolate it. To do so, right-click the text attribute and select Isolate Text. |