This task will show you how to create a quick clipping view using a circle as callout. You can also use a roughly sketched profile.
A quick clipping view is a partial view that shows only what is necessary in the clear description of the object. This operation is applied directly onto the active view.
Open the GenDrafting_clipping_view.CATDrawing document.
Make sure that Put in no show dimension on non-visible geometry is selected in Tools > Options > Mechanical Design > Drafting > View to specify that the dimensions which are attached to non-visible geometry in clipping views should be put in no show mode automatically.
-
Click Quick Clipping View
 in the Views toolbar (Clippings sub-toolbar).
To create a quick clipping view using a sketched profile, click Quick Clipping View Profile
 .
. -
Select the center of the circle.
If you are creating a quick clipping view using a sketched profile, select the required points for sketching a polygon.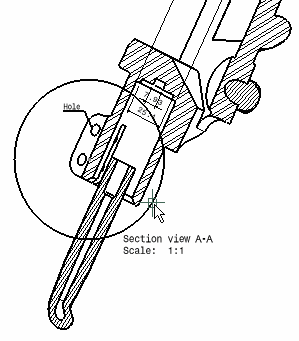
-
Drag the mouse to define the clipping profile and click to end its creation.
If you are creating a quick clipping view using a sketched profile, double-click.
The quick clipping view and the associated profile result as shown here: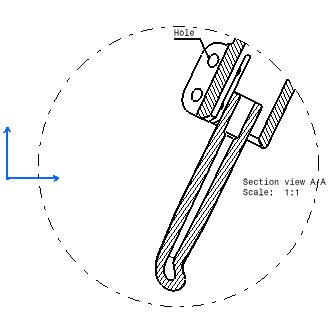
Note the existence of dimensions that are associated to a geometrical element which is not visible in the clipping view: these dimensions are placed in the no-show space. (When applicable, this is also the case of annotations that are associated to such a dimension, and of annotations that are no longer linked to the clipping view.) For more information, refer to View > Quick Clipping View in the Customizing chapter.
-
Click Swap visible space
 in the View toolbar.
You can now visualize the dimensions (and annotations, when applicable) that no longer appear on the clipping view.

Dimensions are displayed in clipping views using the colors defined in Tools > Options > Mechanical Design > Drafting > Dimension tab, Analysis display mode area. For more information, refer to Analysis display mode. -
If needed, you can show these dimensions again on the clipping view. To do so, click Hide/Show
 in the View toolbar.
You can also select Unclip from the contextual menu. However, selecting this option will not show the dimensions on the unclipped view. -
Select the dimension you want to show on the quick clipping view.
-
Click Swap visible space
again. The selected dimension now appears on the quick clipping view again.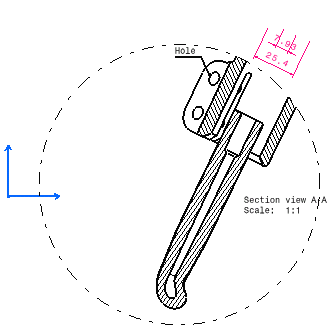
More About Quick Clipping View / Quick Clipping View Profile
- When unclipping a view, the dimensions which were hidden don't reappear. To visualize them, proceed as explained from step 4 to 7.
- You can insert a Bill of Material into the active view.
- Once a clipping has been applied on a view, it is impossible to create breakout views and broken views from this view.
- Once a clipping has been applied on a section, detail or auxiliary view, modifying the section, detail or auxiliary view profile may lead to an update error if this modification places all of the generated geometry outside the clipping profile.
- The color used for dimensions depends on whether the dimension is
interactive (that is, created manually) or generated automatically:
- interactive dimensions are displayed using the color defined for dimensions on non-visible geometry (light blue by default).
- generated dimensions are displayed using the color defined for dimensions generated from 3D constraints (light green by default).
- You can remove a quick clipping view, even after modifying it. In the contextual menu, select the current view object, then Unclip.
![]()