This page deals with the following categories of options in the Dimension tab:
Dimension Creation
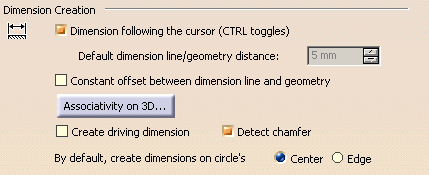
Dimension following the mouse (CTRL toggles)
Select this option to specify that the dimension line should be positioned according to the cursor, following it dynamically during the creation process.
By default, this option is selected.
Default dimension line/geometry distance
If you position the dimension according to the cursor, you can define the value at which the dimension is created. If you create associativity between the dimension and the geometry, you can define the value at which the dimension will remain positioned.
Constant offset between dimension line and geometry
Select this option to specify that the distance between the created dimension and the geometry should remain the same when moving the geometry.
Associativity on 3D... (button)
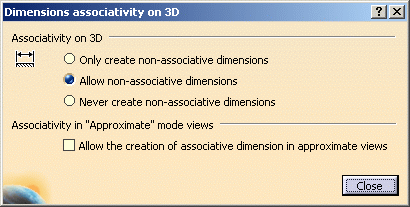 |
If you click the button, the Dimensions associativity on 3D dialog box appears. These options are used in a Generative Drafting context, and they specify how associativity between dimensions and the 3D part or product is handled.
These options only apply to dimensions created with the Dimensioning toolbar commands. They do not apply to dimensions created with the Dimension Generation toolbar commands.
When they are associative, dimensions are linked to the 3D part or product. As a result, when you update the drawing, the dimension is automatically re-computed. When dimensions are not associative, you need to re-create them after performing an update.
Associativity on 3D
When creating dimensions in a Generative Drafting context, specify whether and how dimensions should be associative with the 3D part/product:
- Only create non-associative dimensions: dimensions will never be associative with the 3D.
- Allow non-associative dimensions: dimensions are associative with the 3D whenever possible, but dimensions that cannot be associative with the 3D are also created.
- Never create non-associative dimensions: only dimensions that can be associative with the 3D are created.
Associativity in "Approximate" mode views
Select the Allow the creation of associative dimension in approximate views option if you want the option chosen in the Associativity on 3D section above to be applied to dimensions in Approximate views (i.e. views generated using the Approximate view generation mode.
This option only applies to the following dimension creation commands: Dimensions, Chained Dimensions, Cumulated Dimensions, Stacked Dimensions, Distance/Length Dimensions, Angle Dimensions, Radius Dimensions, Diameter Dimensions, Chamfer Dimensions, Dimension Systems. It does not apply to other dimension types, nor to driving dimensions.
If this option is not selected, dimensions will not be associative in Approximate views (as was the case prior to V5R15), which minimizes memory requirements.
Create driving dimensions
Select this option if you want newly created dimensions to drive the geometry.
A new field will appear in the Tools Palette during the creation process, allowing you to enter the driving dimension value.

Detect chamfer
Select this option to activate chamfer detection: this will lets you create chamfer dimensions in a single click.
As chamfer detection may slow performance down, you may want to deactivate this option for large products or assemblies.
By default, create dimensions on circle's
Specify whether the dimension you will create between a circle and another element should be on the circle center or on the circle edge.
Move
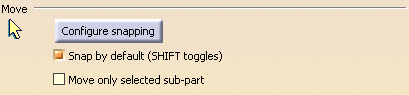
Configure snapping
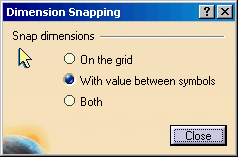
Click the Configure snapping button to define how snapping should be performed. In the dialog box that appears, specify whether the dimension should be snapped on the grid, whether the dimension value should be located at its default position between symbols (it will work only if the cursor is between the symbols), or both.
Snap by default (SHIFT toggles)
Select this option to activate snapping by default when creating or handling dimensions. Pressing the Shift key will enable you to temporarily deactivate snapping. Note that snapping is performed according to the options set in the Configure snapping dialog box.
With this option unselected, snapping is not active. In this case, pressing the Shift key will enable you to temporarily activate it.
Before V5 R15, this option used to be called Activate Snapping (SHIFT toggles).
Move only selected sub-part
Select this option if you want to move only a dimension sub-part (text, line, etc.).
Line-Up

Default offset to reference
This allows you to set the offset between the smallest dimension and the reference element.
Default offset between dimensions
This allows you to set the offset between dimensions.
Align stacked dimension values
Lets you align all the values of a group of stacked dimensions on the value of the smallest dimension of the group.
Align cumulated dimension values
Lets you align all the values of a group of cumulated dimensions on the value of the smallest dimension of the group.
Automatically add a funnel (For pre-V5R14 cumulated dimensions)
Whenever the value of a V5R14 cumulated dimension requires a funnel to be displayed correctly, lets you have one added automatically.
Analysis Display Mode

Activate analysis display mode
Select this option to display dimensions using different colors according to their status (not-up-to-date, isolated, fake, etc.).
Additionally, click the Types and colors button to customize the colors that will be used. The Types and colors of dimensions dialog box lets you assign the desired color(s) to the selected dimension types. You will then be able to visualize the different types of dimensions using their assigned colors.
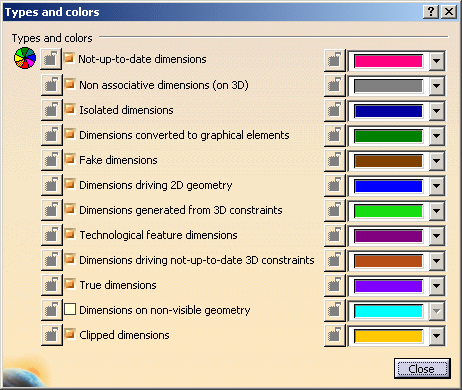
Note: The Dimensions on non-visible geometry option is never applied to generated dimensions and to thread dimensions created with the Thread Dimension
icon.