The batch monitor lets you create as many batch configurations as required, and follow the progress of an update. Updating drawings via the batch monitor will be particularly helpful if you need to update a great number of drawings (but do not need to visualize them while doing so), or drawings which require large CPU resources.
For more details on using the batch monitor, refer to Using the Batch Monitor in the Infrastructure User's Guide.
-
Run the CATUTIL command, using one of the methods described in the Infrastructure User's Guide. For example, from a V5 session, choose Tools > Utility. The batch monitor appears, listing available batches.
At this point, you either:
-
need to define the batch parameters that will be used to launch drawing update (this is the case if this is the first time you are using the batch monitor for drawing update),
-
or you can run the batch directly (this is the case if you already defined all the necessary data).
-
Defining the batch parameters |
|
-
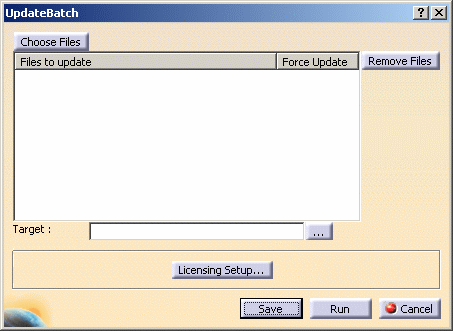
From the list of available batches, double-click UpdateBatch (you can also right-click UpdateBatch and select New parameters file). The UpdateBatch dialog box is displayed.

-
Click the Choose Files button to select the files that you want to update by batch. A selection dialog box is displayed.
-
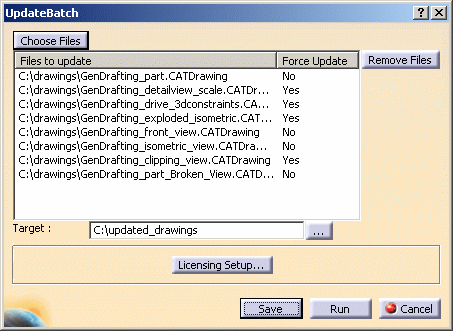
Browse to the directory (on your computer or on your network) which contains the files that you want to include, select these files, and click Open. The selected files are now listed in the UpdateBatch dialog box.
-
Repeat steps 3 and 4 if you want to include files from another directory.

You can remove files from the list of the files to update. To do so, select the unwanted file and click the Remove Files button. -
By default, the files which do not need to be updated will not be. However, you can decide to force the update for certain files, or for all of them. To do this, double-click on No in the Force Update column for each file for which you want to force the update. The value is now set to Yes, which means the update will be forced.
-
Click the [...] button next to the Target field to select the directory in which you want the updated files to be saved. A dialog box is displayed.
-
Browse to the directory in which you want to save the updated files, select it and click OK. Your update batch parameters are now defined.
Each time you run the update batch, updated files present in this target directory will be overwritten by the newly updated files.

-
Click the Save button to specify where you want to save your batch parameters. A dialog box is displayed.
-
Browse to the directory in which you want to save the batch parameters file, specify a file name in the appropriate field, and click Save. Your parameters are saved in an xml file.
-
You can now either click Run to run the batch immediately or click Cancel to close the UpdateBatch dialog box and run the batch later. For the purpose of this scenario, click Cancel.
You can now exit the batch monitor. To play the next scenario, Running the batch, however, you will need to re-open the batch monitor.
Running the batch |
|
-
From the list of available batches, right-click UpdateBatch and select Associate a parameters file.

A selection dialog box is displayed.
-
Browse to the directory in which you previously saved the xml batch parameters file, select this file, and click Open to validate.
-
Access the Start tab which now displays the name and location of the file you just associated to the batch.

-
Right-click the batch and select Run. The batch execution starts.
-
During or after the batch execution, you can get more information on the process in the Processes tab: the batch name, the batch identification number, the status (in progress or ended) as well as the start and end time.
When the batch execution is over, you can exit the batch monitor.
![]()