and using MULTICAx ID Plug-in.
It also offers advice regarding when this technology should be used.
Output Formats
Importing I-DEAS data into V5 results in a conversion of the imported
data to one of three formats, selectable by the user.
Depending on how the imported data will be used, the user can choose whether
to create CGR,
CGR with canonical information or CATPart data.
Each format has its own advantages and limitations:
- CGR (Visu mode). CATIA Graphical Representation is the visualization
format of CATIA V5.
With this very light format, you can do approximate measurement and have access to all the basic DMU functionalities. - CGR with canonical information which enable exact measurement and exact snapping (Visu Snap mode)
- CATPart (CATPart mode). It is a standard V5 CATPart which is locked,
therefore you can use it as any other CATPart
with the exception that you cannot modify it. You can just reference it.
Supported Features
- Access to part user attributes (via Edit->Properties)
- Move
- Exact positioning (Snap command) when using CATPart mode
- Exact positioning when using Visu mode
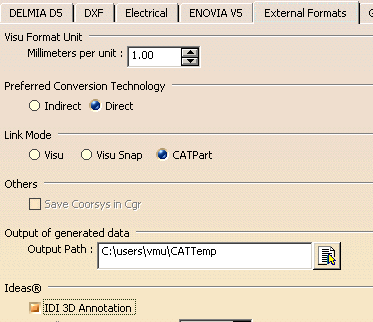
- To activate the Exact snapping support, the user has to be in Visu
mode
(Tools>Options>General>Compatibility>ExternalFormats>Link Mode). - Exact snapping for CGR conversion can be performed only if the IDI file contains BRep and Analytic data.
- To activate the Exact snapping support, the user has to be in Visu
mode
- Clash detection (on CGR)
- Approximate measurements (or exact measurement with a CATPart)
- Inertia and volume calculations.
- Color support.
Translation of FTA data from IDI files to CATIA V5 CATPart files
This functionality is available in CATPart mode, when the IDI 3D
Annotation option is selected.
See the Customizing section for more details.
The annotations translated are:
- Dimensions as Dimensions,
- Hole (matrix) as Note Object Attribute Hole,
- Notes as Texts,
- Spot Welds as Note Object Attribute Spot weld.
The translation results in CATParts containing both BRep and FTA data,
with no conceptual link between the BRep data and the geometry.
The visual display of those annotations depends on the V5 settings.
Naming Conventions in CGR
The name of an IDEAS part or assembly inserted in V5 is as follows:
- if the Part Number of the inserted IDEAS part or assembly is xxxxx_yyyyy and its Part Name is abcd,
- the name in V5 will be xxxxx_yyyyy_abcd.cgr,
- the name in CGR in the specification tree is xxxxx_yyyyy#abcd.1.
Conversion of Electrical Harness data
Electrical harness data are held in the Assembly section of the IDI file
together
with some parts called connectors as children.
They are converted as follows:
- the conversion of facetted data results in the creation of CGR file for the Harness geometry,
- the conversion of Brep data conversion results in the creation of CATPart (or cgr in case of Visu Snap usage),
- the harness data node is inserted as a subassembly node in the V5 assembly hierarchy,
- the harness geometry is converted and saved in a CATPart or CGR file,
- the naming convention is <<PartName>>_<<Component ID of the part>>.
- the harness geometry cannot be stored in the CATProduct file.
An additional CATPart file will be created to contain the harness geometry and
this will be referenced from the CATProduct file. - the harness data node in CATIAV5 has children: the Connector parts +
the CATPart in which the harness geometry will be placed. - the harness data are stored as a normal CATPart \ CGR on the disk and not as Harness-Representation in V5.
- wireframe data (Tessellated \ precise) present in the harness geometry are not supported
Step Attribute support
- The names of the parts present in an I-DEAS model file appear as Part
Number attributes in
the Properties > Product tab page in DMU Navigator. - In addition, the I-DEAS part revision number is also imported into
this tab page as the Revision attribute.
These fields may be used for defining criteria used in the Product Structure Search command.
Limitations
- The generated cgr are only surfacic, it means that no volume calculation can be performed on the models.
- On Windows platform, if IDEAS contain a part with characters like ">" or "<" in its Part Name, the conversion will fail.
IDI data in V5
Options to be set in IDEAS modeler to generate correct IDI file
Exporting of IDEAS part or assembly to IDI
-
Select menu File->Export->Viewer XML (IDI).
User will be prompted to select part. After selection, options dialog box will pop-up.
This box will have options listed in following table. Recommended setting of these options
for type of IDI file ( BREP/FACET) are also listed in the table.
| IDI File Type |
Option |
Status | Location of option |
Comments |
| Options>Advanced> Advanced Export Options |
||||
| BRep | Auxiliary attributes | ON | Part Options | Auxiliary attributes are exported |
| Precise BRep | ON | Part Options | BRep data are exported | |
| Analytic output | ON | Part Options
|
Analytic data are exported | |
| Tessellated Content | OFF | Part Options
|
All the four options under this category to be put OFF. Facetted data will not be exported. |
|
| Annotation Content | ON/OFF | Part and Assembly Annotation Options | Put ON the options under this
category f annotations are to be exported. |
|
| Compress | OFF | File Options | IDI file written is not zipped. | |
| Facetted | Auxiliary attributes | ON | Part Options | Auxiliary attributes are exported |
| Precise BRep | OFF | Part Options | BRep data are not exported | |
| Analytic output | OFF | Part Options
|
Analytic data are not exported | |
| Tessellated Content | ON | Part Options
|
All the four options under this category to be put ON. Facetted data will not be exported. |
|
| Triangle Strips | ON | Advanced Options | Facets made of Tristrips | |
| Triangle Fans | ON | Advance Options | Facets made of Trifans | |
| Annotation Content | ON/OFF | Part and Assembly Annotation Options |
Put ON the options under this
category if annotations are to be exported. |
|
| Compress | OFF | File Options | IDI file written is not zipped. |
IDEASIDIConv.exe
IDEAS to IDI converter executable name is IDEASIDIConv.exe.
IDEASIDIConv.exe converter will support reading of native IDEAS files.
IDEAS to IDI converter will take the name of the IDEAS file and other user
options as command line parameters.
Converter will launch IDEAS modeler session.
Input IDEAS file will be loaded in the modeler and IDEAS macros will be used
to generate IDI file
with appropriate options.
Command line options supported are:
Input IDEAS file name ( .mf1, .pkg, .prt , .asm)
Output IDI file name
Asm for assembly and Prt for part( valid only for .pkg and .mf1 file)
To generate only facet output
To generate only BREP output with analytic data
To generate both facet + BREP with analytic data output.
To specify the project name ( valid only for .asm, .pkg, .prt files)
To specify library name ( valid only for .asm, .pkg, .prt files)
To specify name Assembly to be exported ( valid only for .asm )
To specify name of Part to be exported. ( valid only for .asm )
To specify revision number of part to be exported ( valid only for .prt and .pkg)
to run the converter.
set IONA=%SDRC_INSTL%\Iona
set PATH=%PATH%;%SDRC_INSTL%\sec;%SDRC_INSTL%\ideas;E:\SDRC\Team\Master\Config\;%IONA%\bin;%SDRC_INSTL%\oirun\lib;%SDRC_INSTL%\bin;
set SDRC_SOFTWARE=I-DEAS
set SDRC_SEC=%SDRC_INSTL%\sec
set LM_LICENSE_FILE=%SDRC_INSTL%\sec\Sdrc_Ms9.lic; ( if license is a node locked type)
set LM_LICENSE_FILE=7609@octane ( if license is floating type ( IDEAS daemon port @ license server name)
set IDEAS_PARAM9=E:\SDRC\Team\Master\Config ( location of team configuration file.)
set XKEYSYMDB=%SDRC_INSTL%\xfiles\Xkeysmdb
set ORBIX_BIN=%SDRC_INSTL%\Iona\bin
set SDRC_MPATHS=%SDRC_INSTL%\SDRCHelp
set platform=winnt
set SDRC_TEAM_SERVER_TYPE=FLEXLM
set SETUPVARBS='1'
set SystemDrive= D:
set SystemRoot=C:\WINNT
set QA_IDEAS_INSTALLDIR=%SDRC_INSTL%
set QA_IDEAS_CURDIR=D:\tmp\test_dir ( location of folder where IDEAS temporary files are generated).
IDEASIDIConv.exe -i a.mf1 -o a_mf1.idi -type Asm -facet
IDEASIDIConv.exe -i b.mf1 -o b_mf1.idi -type Prt -brep
IDEASIDIConv.exe -i c.pkg -o c_mk1.idi -type Asm -all -pro system -lib idimport -a Engine_Cover
IDEASIDIConv.exe -i d.pkg -o d_pkg.idi -type Prt -all -pro system -lib idimport -p PartName -rev 2
IDEASIDIConv.exe -i e.pkg -o e_pkg.idi -type Asm -all -pro system -lib idimport -p Part_1 -rev 2
IDEASIDIConv.exe -i f.asm -o f_asm.idi -facet -pro system -lib idimport -a Intake_manifold -rev 2
IDEASIDIConv.exe -i f.asm -o f_asm.idi -brep -pro system -lib idimport -p Bolt_2 -rev 1
IDEASIDIConv.exe -i g.prt -o g_prt.idi -all -pro system -lib idimport -p RH_DOOR -rev 12
Limitations of IDI To CATIA V5 Converter
- IDI-CGR Converter: converts IDI file with facet data to CATIA V5 CGR
file.
- The generated CGR file does not have volume information:
the input IDI file does not have connectivity information, hence CGR the file generated
does not contain volume information.
- The generated CGR file does not have volume information:
- IDI files generated from IDEAS MS8 and containing isolated "&"
characters are not supported
as they are not XML compliant.
If you want to read them properly, you need to replace all the occurrences of the isolated ""&" by "&"
which is the correct XML syntax. - IDI files generated with IDEAS MS10 and MS11 are supported.
Environment
The ideal working environment makes use of the following:
-
Cache mode
ON
(set via Tools->Options->Infrastructure->Product Structure->Cache Management) -
File format:
- CGR for users that need better performance and do not require exact positioning (or exact measuring)
-
CATPart for users that need the additional
features provided by the CATPart format
(such as exact measurement, exact positioning, kinematics, etc.)
- Batch mode
Using CATPart Mode vs Visu Mode
The MULTICAx ID Plug-in supports
CATPart mode,
allowing for I-DEAS parts to be imported as CATPart data files.
In this mode, I-DEAS part data contained by the solid body is transferred
into a CATPart.
Because CATPart files are large and take more time to convert, CATPart mode management is an optional feature.
CATPart features and limitations
The features and limitations of Multi-CAD CATParts are identical to those
of all other V5 CATParts
with the exception that the generated CATPart is locked and can be
referenced but not modified.
The user should be aware that the conversion to the CATPart
format requires more time than only
generating the CGR (faceted) format. In addition, CATPart files are larger
than their corresponding CGR files.
Therefore, it is recommended that CATPart mode is only enabled if exact
positioning, exact measurement or
putting constraints is required.