Defining Graphic Representations for a Part

This task shows you how to create multiple graphic representations for a part.  
Once you have created a part and specified a type, you can create one or more graphic representations, i.e., create the body of the part. You can define multiple graphic representations when you need to show more than one graphic of the same component. For instance, you may need to show a door as "layout", which is like a 3D version, or "envelope," which also includes the working area needed around the door, or "opening," which incorporates the opening associated with the door. These categories are defined in this application.  You can create these graphics of the same part and place whichever one you prefer in a document.

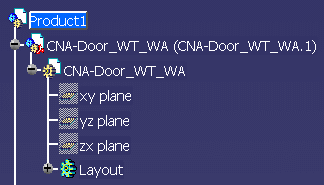
Before you create multiple representations you should set up a Graphic Representations file. (You do this by creating a file - a default is provided if you want to use it - and noting its location in your resource management file. See Understanding Project Resource Management.) A Graphic Representations file allows you to classify each graphic that you create into a specific category. In addition to the categories that are defined in the application, you can create categories based on your specific needs.

When you create a part as explained in Create part with specified type, it is given the first classification listed in your Graphic Representations file. The following procedure uses Layout as an example.

  Only one graphic representation of a part can be active - displayed - at any one time. However, if you place the same part - say a door - more than once in a document then each of those parts can have a different graphic representation active.
1. To start making graphic representations for the part, you must first create a graphic for the Layout representation that you have already created. To do this double click on CNA-Door to bring up the Part Design product. (Not all users may have a license for Part Design - contact your system administrator.)


2. Create your part (in this case a door) using Part Design. (See Part Design documentation if you need help.) You have now created the Layout graphic representation of the part. 

3. To create a second graphic representation, double click on the CNA-Door entry to return to Compartment and Access.
4. Click on the Build Part button to display the Create Part dialog box.
5. Activate the buttons in the Create Part dialog box by clicking on the door.
6. Click on the Manage Graphic Representations button . The Manage Graphic Representations dialog box displays.

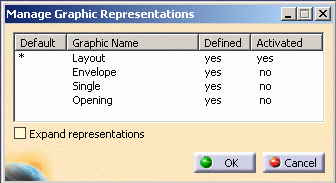
The Defined column shows which representations exist for the part. If a name has No against it you can create a representation by clicking on No. It changes to Yes and the graphic name is added to the specifications tree.

If the value for a graphic in the Activated column is Yes it means you can see that graphic. (You can toggle between Yes and No by clicking on it.) If you check the box Expand representations you can see more than one representation of that part in the same document - if the representation exists.

7. Create a body for the part as described above. 

In the illustration below you can see both layout and envelope representations.