This task shows you how to update the compartments of a wall system.
Updating compartments allows you to split and merge compartments. Compartments are then regenerated, and old ones are removed. You can, however, assign the attributes of removed compartments to the regenerated compartments. (Certain updates, such as moving a wall, do not regenerate and remove compartments.)
See Updating a Wall System for information on how to update a wall system after you have extracted the walls.
Click the Update Wall System button
![]() ,
and select any of the wall system Sketcher lines in your
document.
,
and select any of the wall system Sketcher lines in your
document.
The Update Wall System dialog box displays.

The Wall System Status field shows that the wall system is out of date.
Click the Update Wall System button (beside the Wall System Status field) to update the wall system. The Update Compartments dialog box displays.
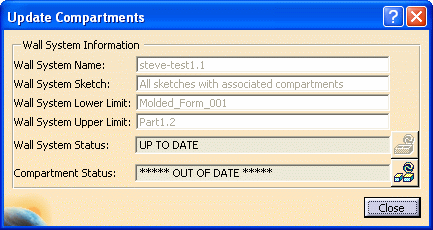
The Wall System Status field shows that the wall system is now up to date, but the Compartment Status field shows that compartments are out of date.
Click the Update Compartments button
![]() .
.
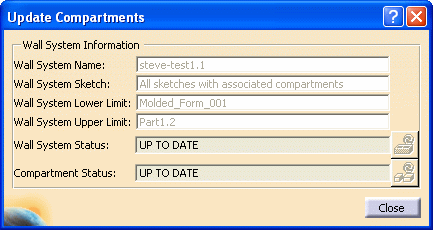
If the update was of the type that does not regenerate and remove compartments (moving a wall, for instance), the Compartment Status field indicates that the compartment status is up to date.
When you add or delete a wall (split or merge compartments), compartments are regenerated and removed.
For this type of an update, clicking the Update Compartments button displays the Managing Resulting Compartments dialog box.
The regenerated compartments (the result of a merge or a split) display in the Compartments to Resolve frame at the top.

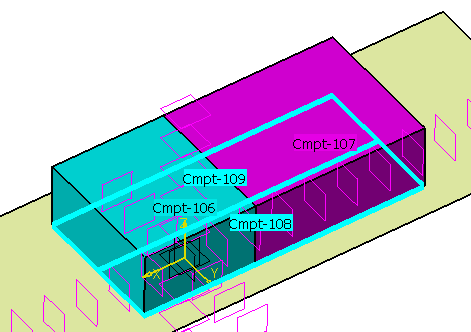
When you select a regenerated compartment from the Compartment column, the compartments that were merged or split (resulting in this regenerated compartment) display in the Compartments to be Removed frame. They also display in your document.

In the example above, selecting Cmpt-089, causes Cmpt-087 and Cmpt-088 (the two compartments that merged to create Cmpt-089) to display in the Compartments to be Removed frame. The Clash column shows Merge, indicating these two compartments merged and are being removed.
When you split a compartment, as in the in the example below, two regenerated compartments display in the Compartments to Resolve frame.

Selecting Cmpt-112 or Cmpt-113 causes Cmpt-111 (the compartment that split to create the two compartments) to display in the Compartments to be Removed frame.

The Clash column shows Split, indicating this compartment split and is being removed.
When you create a clash between regenerated compartments and old compartments, the regenerated compartments display in the Compartments to Resolve frame, and the old compartments to be removed display in the Compartments to be Removed frame. Clash displays in the Clash column.
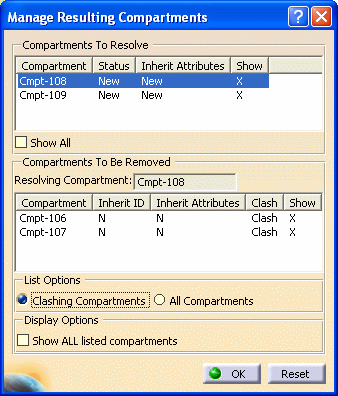
- If you select Clashing Compartments in the List Options section, old compartments (to be removed) that clash with the selected compartment display in the Compartments to be Removed frame.
- If you select All Compartments, clashing and non-clashing compartments (to be removed) display in the Compartments to be Removed frame.
The following shows how the clashing compartments display in your document.
To assign attributes of old compartments (to be removed) to regenerated compartments, select a compartment ID in the Compartments to Resolve frame.
- To inherit the ID and attributes of an old compartment, select the old compartment in the Compartments to be Removed frame, and click the N under the Inherit ID column. Y now displays, and the new compartment has the same ID as the old one. (The old one displays as Old.)
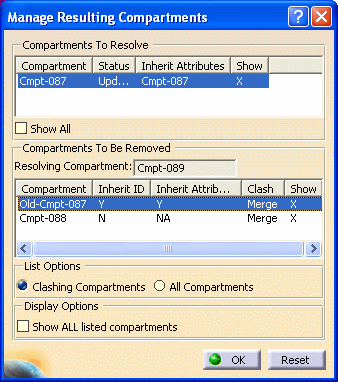
Its status is Updated, and the Inherit Attributes column indicates that it has the attributes of the old compartment. (When a new compartment inherits the ID of an old compartment, it also inherits the attributes.)
- To inherit only the attributes of an old compartment, select the old compartment in the Compartments to be Removed frame, and click the N under the Inherit Attributes column. Y now displays, and the new compartment displays the ID of the old compartment under the Inherit Attributes column in the Compartments to Resolve frame.
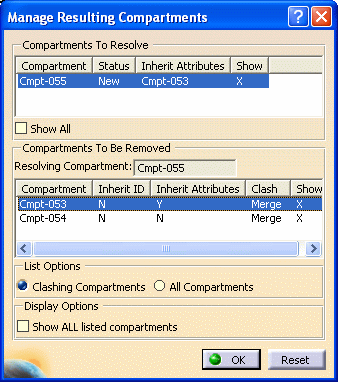
When you have completed assigning ID and attributes to new compartments, click OK. The Update Compartments Statistics box displays, indicating the number of compartments that have been created, removed, and modified.
Click OK on the Update Compartments Statistics box. The Update Compartments dialog box now shows that the Compartment Status is up to date. Click Close to close the dialog box.