|
This task explains how to use a
new computing system known as "clusters". A cluster is a set of several
computers: one master computers and several slave computers.
This new hardware support is an alternative to the SGI solution. It is
intended for reality centers and "caves" requiring several projectors to
light up the whole screen surface and thus, a computing system with several
graphics boards.
With clusters, you run Version 5 on the master computer running Windows
and, thanks to the support of the "Conduit" Fakespace CAA product, you can
distribute the display of the model on several slave computers with a
different viewpoint on each slave. |
|
Overview
The screen definition (i.e. position and size), the name of the slave
computers as well as the mapping slaves/screen are defined using the
Immersive System Assistant workbench. This definition is then used by
each slave to compute the viewpoint it is supposed to use to render the
model.
This type of display system is used for
- collaborative presentations: a trained operator pilots the standard
Version 5 session from a desktop installation. The application is
displayed on a very large stereoscopic wall which makes the collaboration
easier and allows a display of the model with a 1:1 scale.
The application is the design visualization: the designers have a
realistic depth perception of the geometric data they are working on
- immersive studies: the user gets the impression that the model is
floating in the room and is able to move around and inside it. The model
perception is very close to reality.
The application is the subjective impression analysis, e.g. at the end of
the product lifecyle, simulation of the final product's aspect for
textiles, colors, etc.
|
|
Software Architecture
The display on distant slave computers by the master Version 5
application is done thanks to the Fakespace "Conduit" CAA product.
This product:
- ensures the communication between the master and the slaves
- retrieves the OpenGL calls Version 5 sends to the OpenGL driver
- send these calls to each of the slaves
- manages the way each slave modifies the OpenGL stream before sending
it to its own graphics board.
|
|
Configuration Example
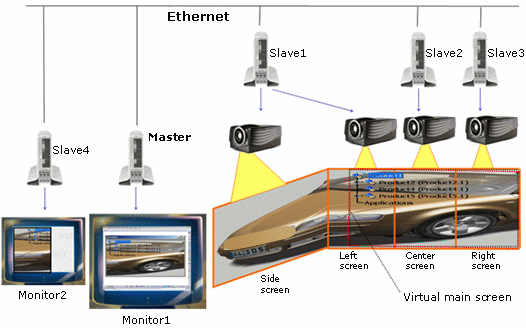
Let's suppose we have five computers, one master and four slaves named
"Master", "Slave1", "Slave2", "Slave3" and "Slave4", respectively.
Our reality center is made of four screens, four projectors, and two
monitors. Three screens are on the same plane facing the user and one is tilted on
the left side:
|
|
|
|
The main screen (which is virtual) is made of the image displayed
on the right screen, the center screen and the right half of the left
screen. These images are rendered by "Slave1", "Slave2" and "Slave3".
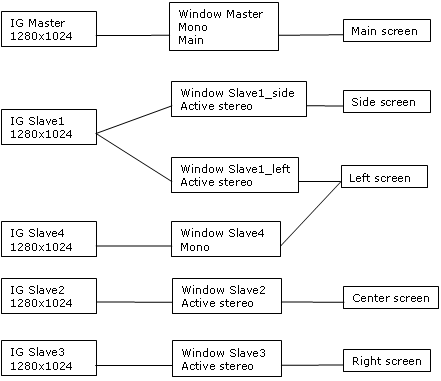
"Slave1" renders two windows for the side and left screens.
"Monitor1" is connected to the master computer and displays the Version
5 aplication.
"Monitor2" is a control monitor connected to "Slave4" and displays the
same image as the one displayed on the left screen.
All the projectors are supposed to project an active stereo image and
the two monitors display monoscopic images.
|
|
|
|
Start the Cluster
First, you need to setup your rendering configuration via the Immersive
System Assistant workbench.
-
Select Start > Infrastructure >
Immersive System Assistant
 . .
| If we keep the configuration example detailed
above, the rendering configuration to define should be as follows: |
 |
| The elements to be defined are detailed below. Click the
hyperlinks to be redirected to the corresponding section in the
Immersive System Assistant documentation: |
-
Create five
IG (i.e. graphics
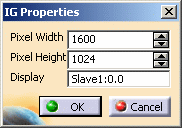
boards) for "Master", "Slave1", "Slave2", "Slave3", and "Slave4". Do not forget that
in our example, "Slave1" is a dual head machine, which implies that it
has a double frame buffer resolution width. This would give, for
instance:
-
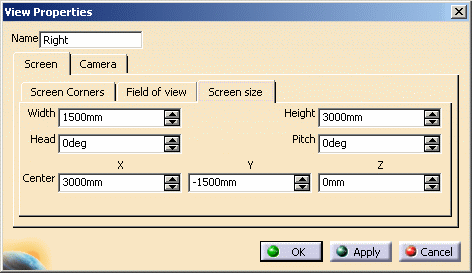
Create four
views for "Right
screen", "Center screen", "Left screen", and "Side screen".
|
Below is an example for the right screen: |
 |
-
Create the main screen. To do so, run New View
once again.
| Tip: select the right screen you created in step 3 before
running New View: the dialog box is initialized with the
right screen parameters. Then, select the left screen: the new view
is enlarged to overlap the left screen and you just have to tune
the parameters manually to make the new view overlap only the right
half of the left screen. |
-
Create the six
windows that should render the OpenGL stream for the screen views you
defined above.
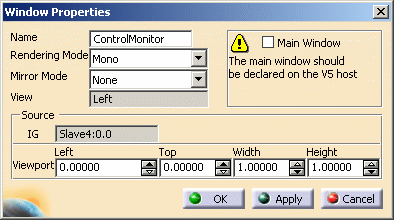
| Below is an example for "Slave4": |
 |
- Do not forget to specify whether the window should render in
Mono or in Active Stereo.
- The window hosted by the master IG should be set as the Main
window.
|
-
If you want to use
trackers or
button devices, some
additional steps are necessary.
-
Select File > Save or File > Save As
to save your document.
-
Generate the XML
configuration file.
| A warning is displayed after clicking OK in the Generate
VR Configuration dialog box since no MPK configuration will
be used. Just click OK to ignore the message. |
-
Select View > Full Screen to activate the
cluster.
| The images are displayed on the slave computers
according to the configuration you defined. |
Another method to start the cluster is to enter
c:startCluster again in the power input box. With this
method, toolbars and menus are displayed (which is not the case
with the Full Screen command).
If you use this method, note that the window is resized according
to the configuration. |
-
To stop the cluster, right-click anywhere in the geometry
area then clear Full Screen or enter c:startCluster
again in the power input box.
|
|
Define Cluster Options
Some cluster parameters can be edited in the Cluster Options area
available in Tools > Options > General
> Devices and Virtual Reality > Devices.
For detailed information, refer to
Customizing Settings > General > Devices and Virtual Reality in the
Version 5 - Infrastructure User's Guide. |
|
 |