-
In the specification tree or in the geometry area, double-click Track.1.
-
In the Track dialog box, click the Activate Analysis
 button to display the analysis list.

This button is unavailable if there are no analyses (interferences or distances) defined in your document. 
Even when the button is unavailable, you can still perform automatic clash detection (without defining a clash specification). To do so: -
Select your track.
-
Select the arrow within Clash Detection (Off)
 from the DMU Check toolbar. Undock the toolbar if
necessary.
from the DMU Check toolbar. Undock the toolbar if
necessary. Clash Mode
-
Activate Clash Detection (On
 or Stop
  modes), then simulate your track.
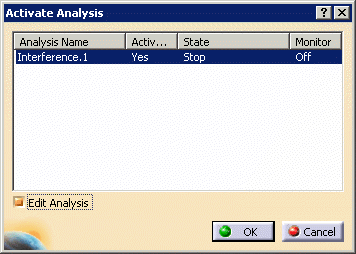
The Activate Analysis dialog is displayed.
-
-
Select the analysis object desired.
When selected, the values for the analysis functions appear. 
-
(Optional) Click on the values under each option to alter the values.
The table below shows the values for the different options. Option Value Effect Activated Yes (default) The analysis object should be checked. No The analysis object will not be checked. If this option is set to No, the values of the options will not take effect. State Off Turns off analysis object. If the option is set to off, the values of the other options will not take effect. On Turns on analysis object. Highlights data that is in violation. Verbose Turns on analysis object. Provides feedback regarding the analysis object to an analysis information window throughout track creation. Stop (default) Turns on analysis object. Stops track creation when a violation occurs; also, provides feedback regarding the analysis object to an analysis information window throughout track creation. Monitor Off (default) The Analysis Monitor window will not appear. On The Analysis Monitor window will appear. 
Read More about clash detection in track context to better understand the combination of the analyses states and the clash detection modes. -
-
-
When satisfied with the fields within the Activate Analysis dialog box (i.e., keep the default State Stop and the default Monitor option Off), click OK.
A Dynamic clash detection information message displays, letting you activate automatic clash detection 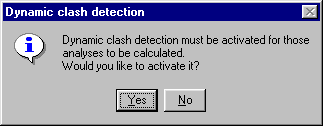
-
Select Yes to activate the clash detection.
The Stop  mode is automatically activated.
 -
Select the Play forward
 button in the Player.
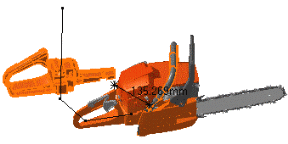
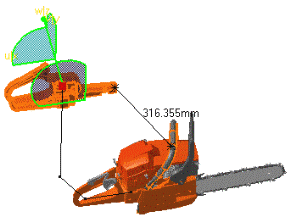
The simulation stops at the first clash, the products are highlighted. The results are shown below; the product in clash is highlighted and the distance is calculated at each position. 
-
Click the Activate Analysis
button to bring
up the Activate Analysis dialog box, and then set the
State to Verbose and Monitor to On.As you create a track for the object, the Analysis Information and Analysis Monitor dialog boxes provide feedback data on the track. The type of feedback provided depends on the analysis object selected. The Analysis Monitor dialog box provides the outcome of the analysis. It is most useful when a user has many analysis objects. The Analysis Information dialog box provides detailed information regarding analysis information throughout the simulation. Because the Analysis Information dialog box provides so much information, users often rely on the Filter option. 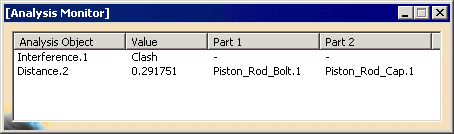
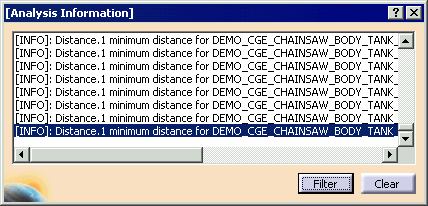
The Analysis Information and Analysis Monitor windows remain on display but inactive when you click OK on the Track dialog box. You can choose use the Filter button to hide/show messages. By default, all may appear. Deselecting one or more categories causes messages with those categories not to appear. Once you have selected the message categories that should not appear, select the OK button. 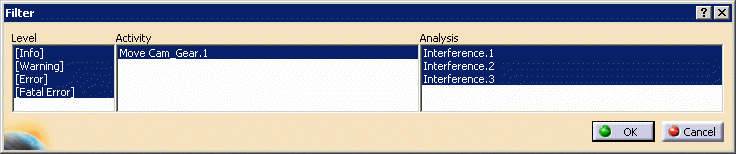
-
Double-click on the INFO line in the Analysis Information dialog box.
A Preview window appears. 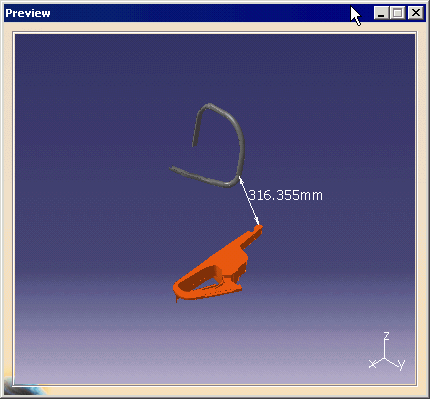
The Edit Distance and Band Analysis dialog box also appears. (It may initially appear behind the Preview window. It and the Analysis Information windows are inactive. Click on the Edit Distance and Band Analysis dialog box to make it active.) 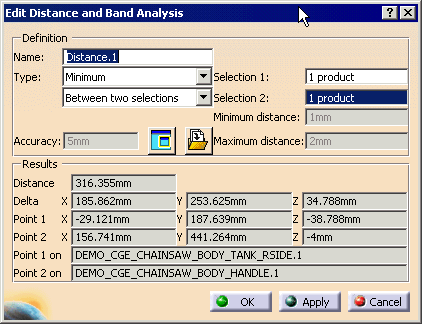
-
Select the Play forward
button in the Player.Clash information appears on the Analysis Information dialog box and the Preview window shows the distance alterations dynamically. -
Click the Cancel button on the Edit Distance and Band Analysis dialog box.
The dialog box and the Preview window disappear. -
Double-click on a Warning line in the Analysis Information dialog box.
A new Preview window and the Check Clash dialog box appear. 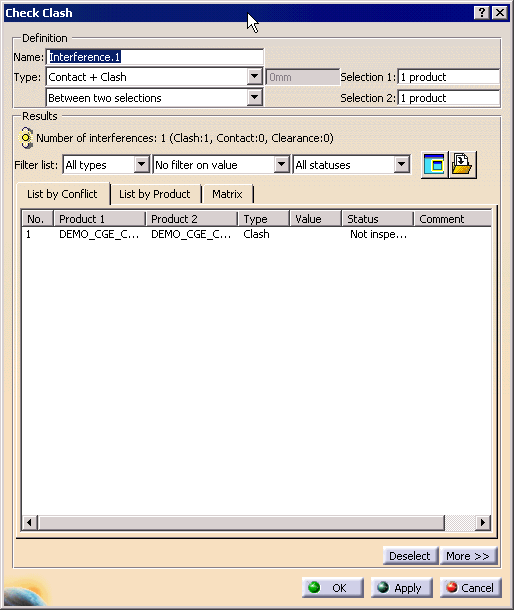
For more information on the Check Clash dialog box, see the DMU Space Analysis User's Guide.
More About Clash Detection in Track Context
|
States in the Activate Analysis Dialog Box |
|||||
| On | Verbose | Stop | Off | ||
| Clash detection modes (per Clash Mode toolbar) |
On |
Calculation only | Calculation + messages | Calculation + messages | No calculation |
| Stop |
Calculation only | Calculation + messages + stop (if collisions detected) | Calculation + messages + stop (if collisions detected) | No calculation | |
| Off |
No calculation | No calculation | No calculation | No calculation | |
- Interference 1 is set to Stop
- Interference 2 is set to On
- Clash detection mode selected:
(Stop mode).
You simulate your track, the track is stopped when interference 1 is detected, interference 2 is calculated and displayed, but does not stop the track simulation.