The objective is to snap the CHAINSAW_ENGINE_FLYWHEEL to the CHAINSAW_ENGINE_CRANKSHAFT_LSIDE.1.
The scenario below aims at showing you this capability:
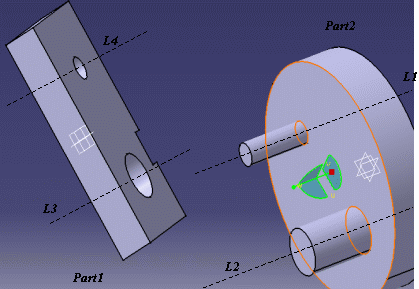
- You are creating a track attached to Part2, you need this part to be plugged into Part1
- Select Dynamic Smart Target
 in the Manipulation toolbar
 - Select the geometries you want to use as constraints for the snap, such as L1, L2, L3 and L4, shown below (the selection order does not matter).
- Manipulate Part2 so that it comes near to Part1. When the selected constraint geometries (e.g., the axes L1 and L4) come near each other, the parts will dynamically snap together with respect to the constraints selected.
- For DMU Fitting, open the file in the product.
- For DPM Assembly Process Simulation, open the file in a workbench such as DMU Fitting that creates .CATProducts. Then drag and drop the geometry onto the ProductList node of the PPR tree.
-
Select Tools > Options > DMU Fitting > DMU Manipulation to verify the snapping settings.
Set (if necessary) values for: - Position: 6mm (default value)
- Orientation: (default value)
-
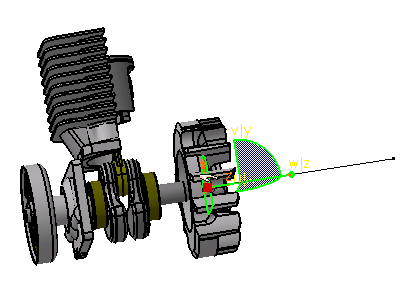
Verify that you are familiar with the location and appearance of the geometries with which you are working:
You want to snap the CHAINSAW_ENGINE_FLYWHEEL1 product to the CHAINSAW_ENGINE_CRANKSHAFT_LSIDE product. -
Perform one of the following:
- In DMU Fitting:
-
Select the shuttle.
-
Click Track
 in the DMU Simulation toolbar.

- In DPM Assembly Process Simulation:
-
Select the Process node.
-
Click Move Activity
 in the Simulation Activity Creation toolbar.
 -
Select the part to be snapped (in this example, the engine flywheel).
-
Click OK in the Edit Shuttle dialog box.
In DPM Assembly Process Simulation and DMU Fitting, the Player, Recorder, and Manipulation pop-up toolbars appear, as well as the Track dialog box. -
Click Dynamic Smart Target
in the Manipulation toolbar.The Track dialog box and the Recorder and Player pop-up toolbars disappear. -
Select the desired constraint geometries (the selection order is not relevant; see below for a key to the tokens used to designate the geometries).
- For this example, first select the axis (cylinder) on the CHAINSAW_ENGINE_CRANKSHAFT_LSIDE product and click to confirm the operation.
- Then, select a plane (inner one) on the CHAINSAW_ENGINE_FLYWHEEL1 product and click to confirm the operation.
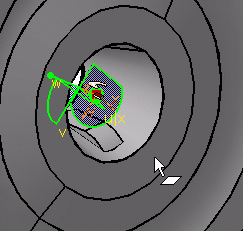
Back to the CHAINSAW_ENGINE_CRANKSHAFT_LSIDE product, select the inner plane as shown below and click to confirm the operation. 
To finish, you need to select another axis on the CHAINSAW_ENGINE_FLYWHEEL1. 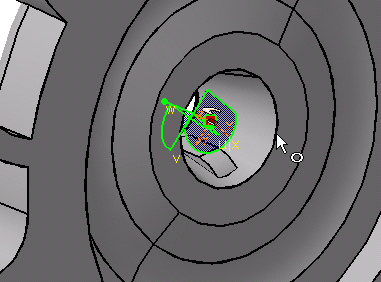
-
Click OK.
-
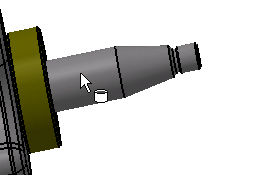
Move the shuttle so as to get it near the object.
 `
` 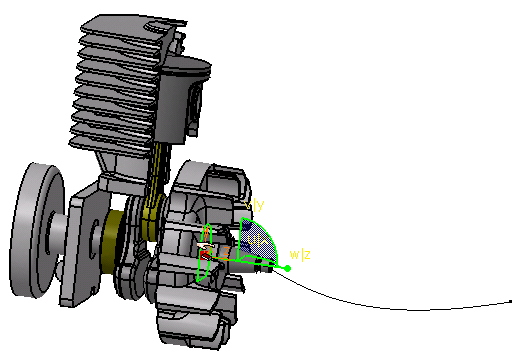
The planes are snapped together as well as the axes. -
Click Dynamic Smart Target
(highlighted in orange).The Track dialog box and the Recorder and Player pop-up toolbars reappear. -
Click Record
 to record the movement of the part as a track.
The track is created; you can replay it using the Player commands. -
Click OK in the Track dialog box.
| Selectable elements | Design Mode | Visualization mode | |
| Point |
Yes |
Yes |
|
| Line
|
Yes |
Yes |
|
| V4 Axis System |
Yes |
Yes |
|
| Plane |
|
Yes |
Yes |